Core Mechanics: The client outlined the key gameplay systems in the provided brief document, which include:
Concept: A fun, casual puzzle game requiring proper planning and visual thinking.
Target Audience: Causal games for ages 30+, targeting players who would not typically play a deep, story-driven game
Client: RaRa Games
University Contact: Rob Blofield
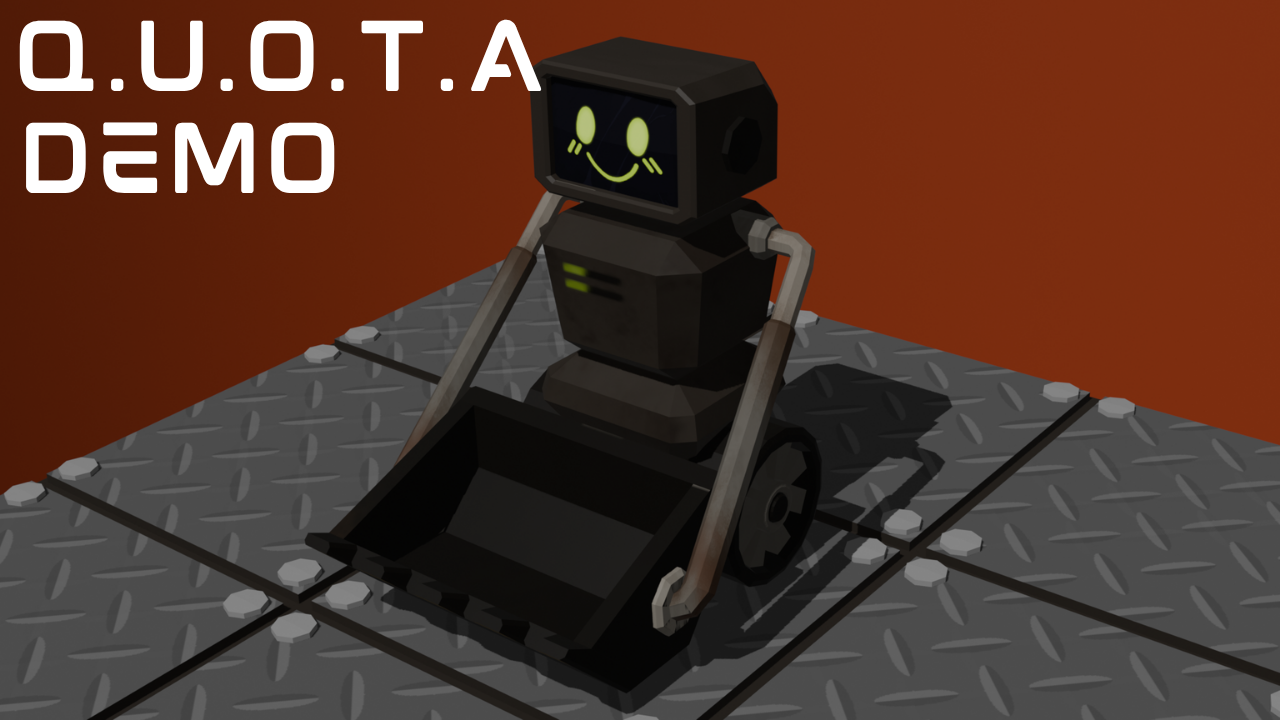
Click Here to Play Demo
Game Artwork by Tally
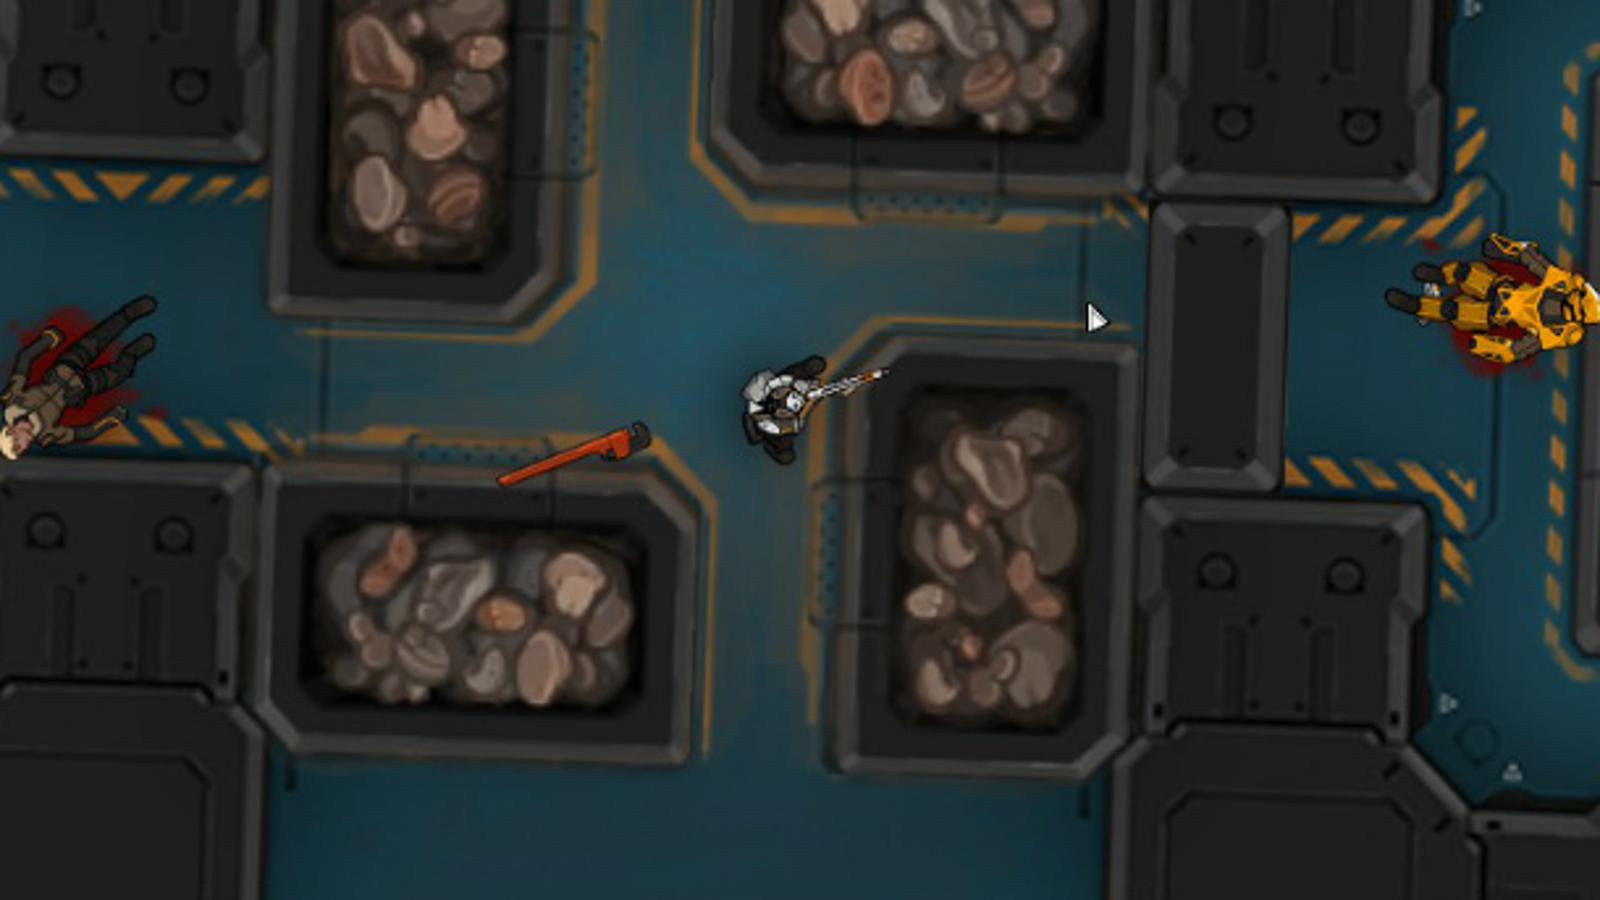
On the surface, Q.U.O.T.A is a casual, isometric grid-based puzzle game that requires the player's visualisation skills. The challenge lies in connecting potential actions to the in-game positional movement. The client emphasised that the player only gets a single attempt to complete the level and cannot test out possible solutions, instead relying on their visual connection ability. The player aims to collect and deposit the required resources in their designated locations(fuel to incinerators and resources to collectors). Once the player has completed their quota by depositing the materials, they move to the next level.
The project's scope was relatively broad, given the timeframe for completion. However, key gameplay elements were prioritised to focus on creating a functional demo. The initial personal scope included the following elements:
This would later be narrowed further, focusing on ensuring client customizability and consistent functionality rather than completing broad, unfinished mechanics. Development focused on random level generation and implementation of basic player movement. Due to this shift, item collection and the energy system were put on hold for the duration of the project.
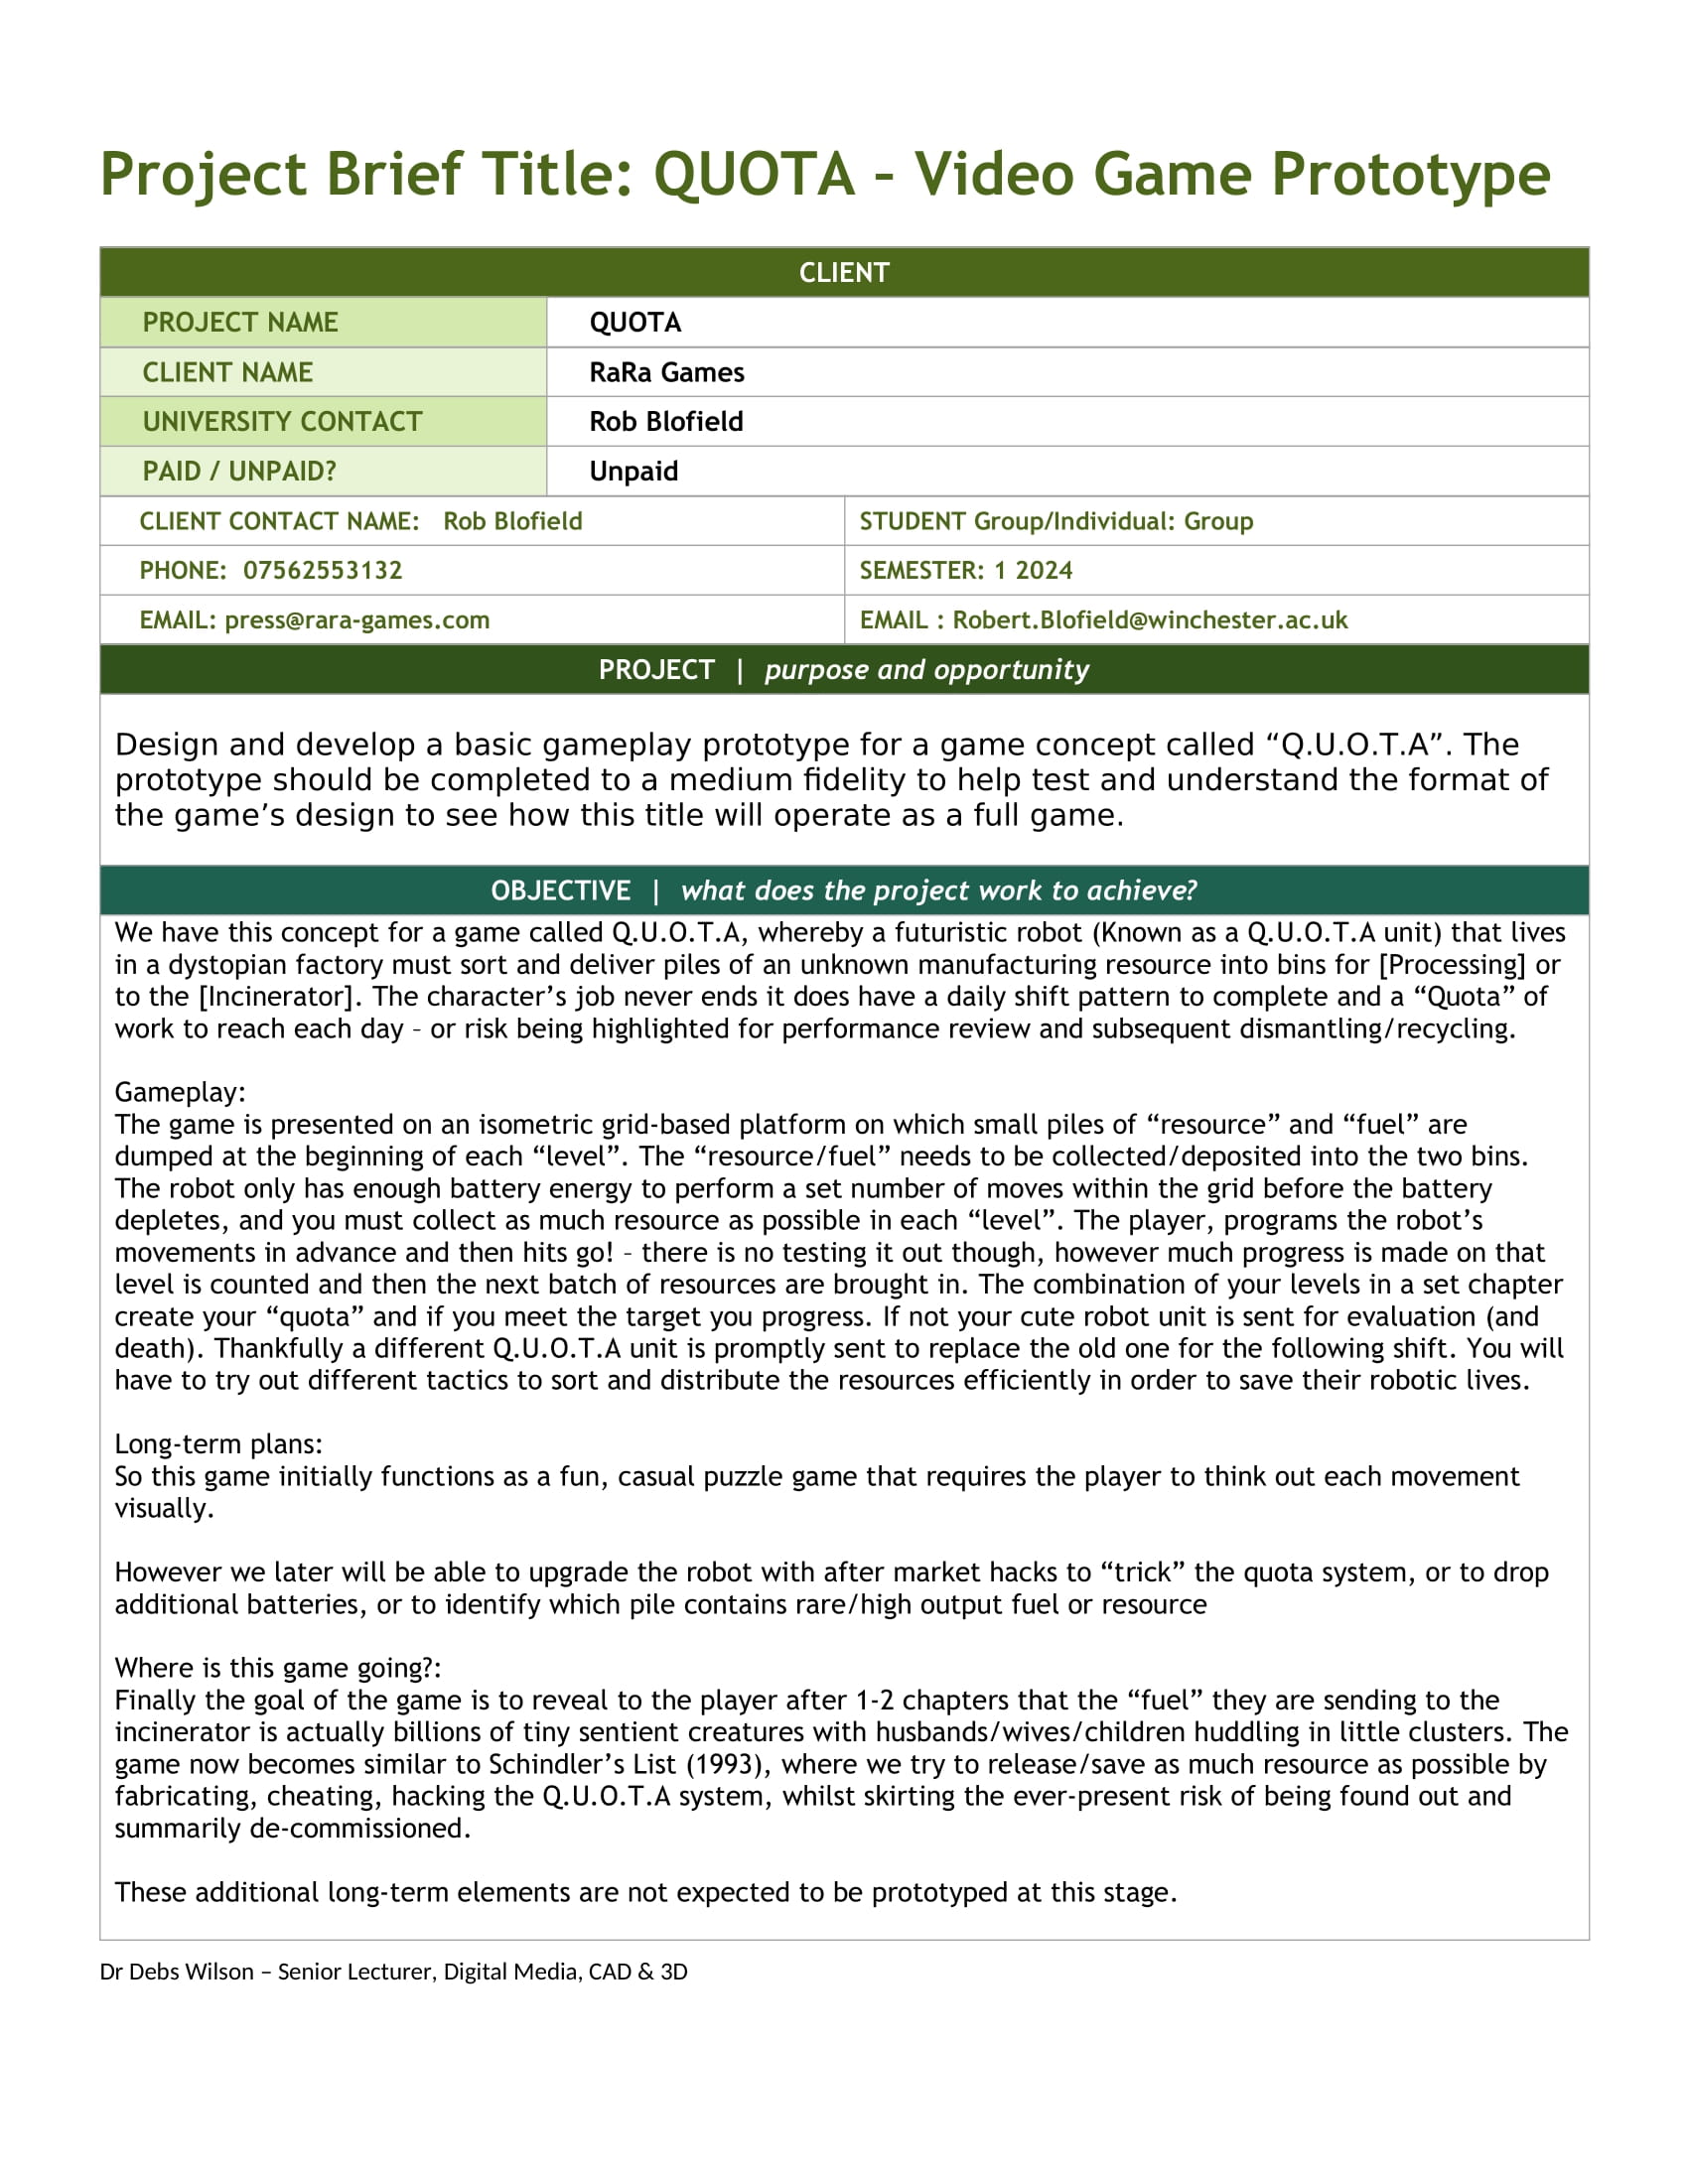
Client Breif Document Part 1
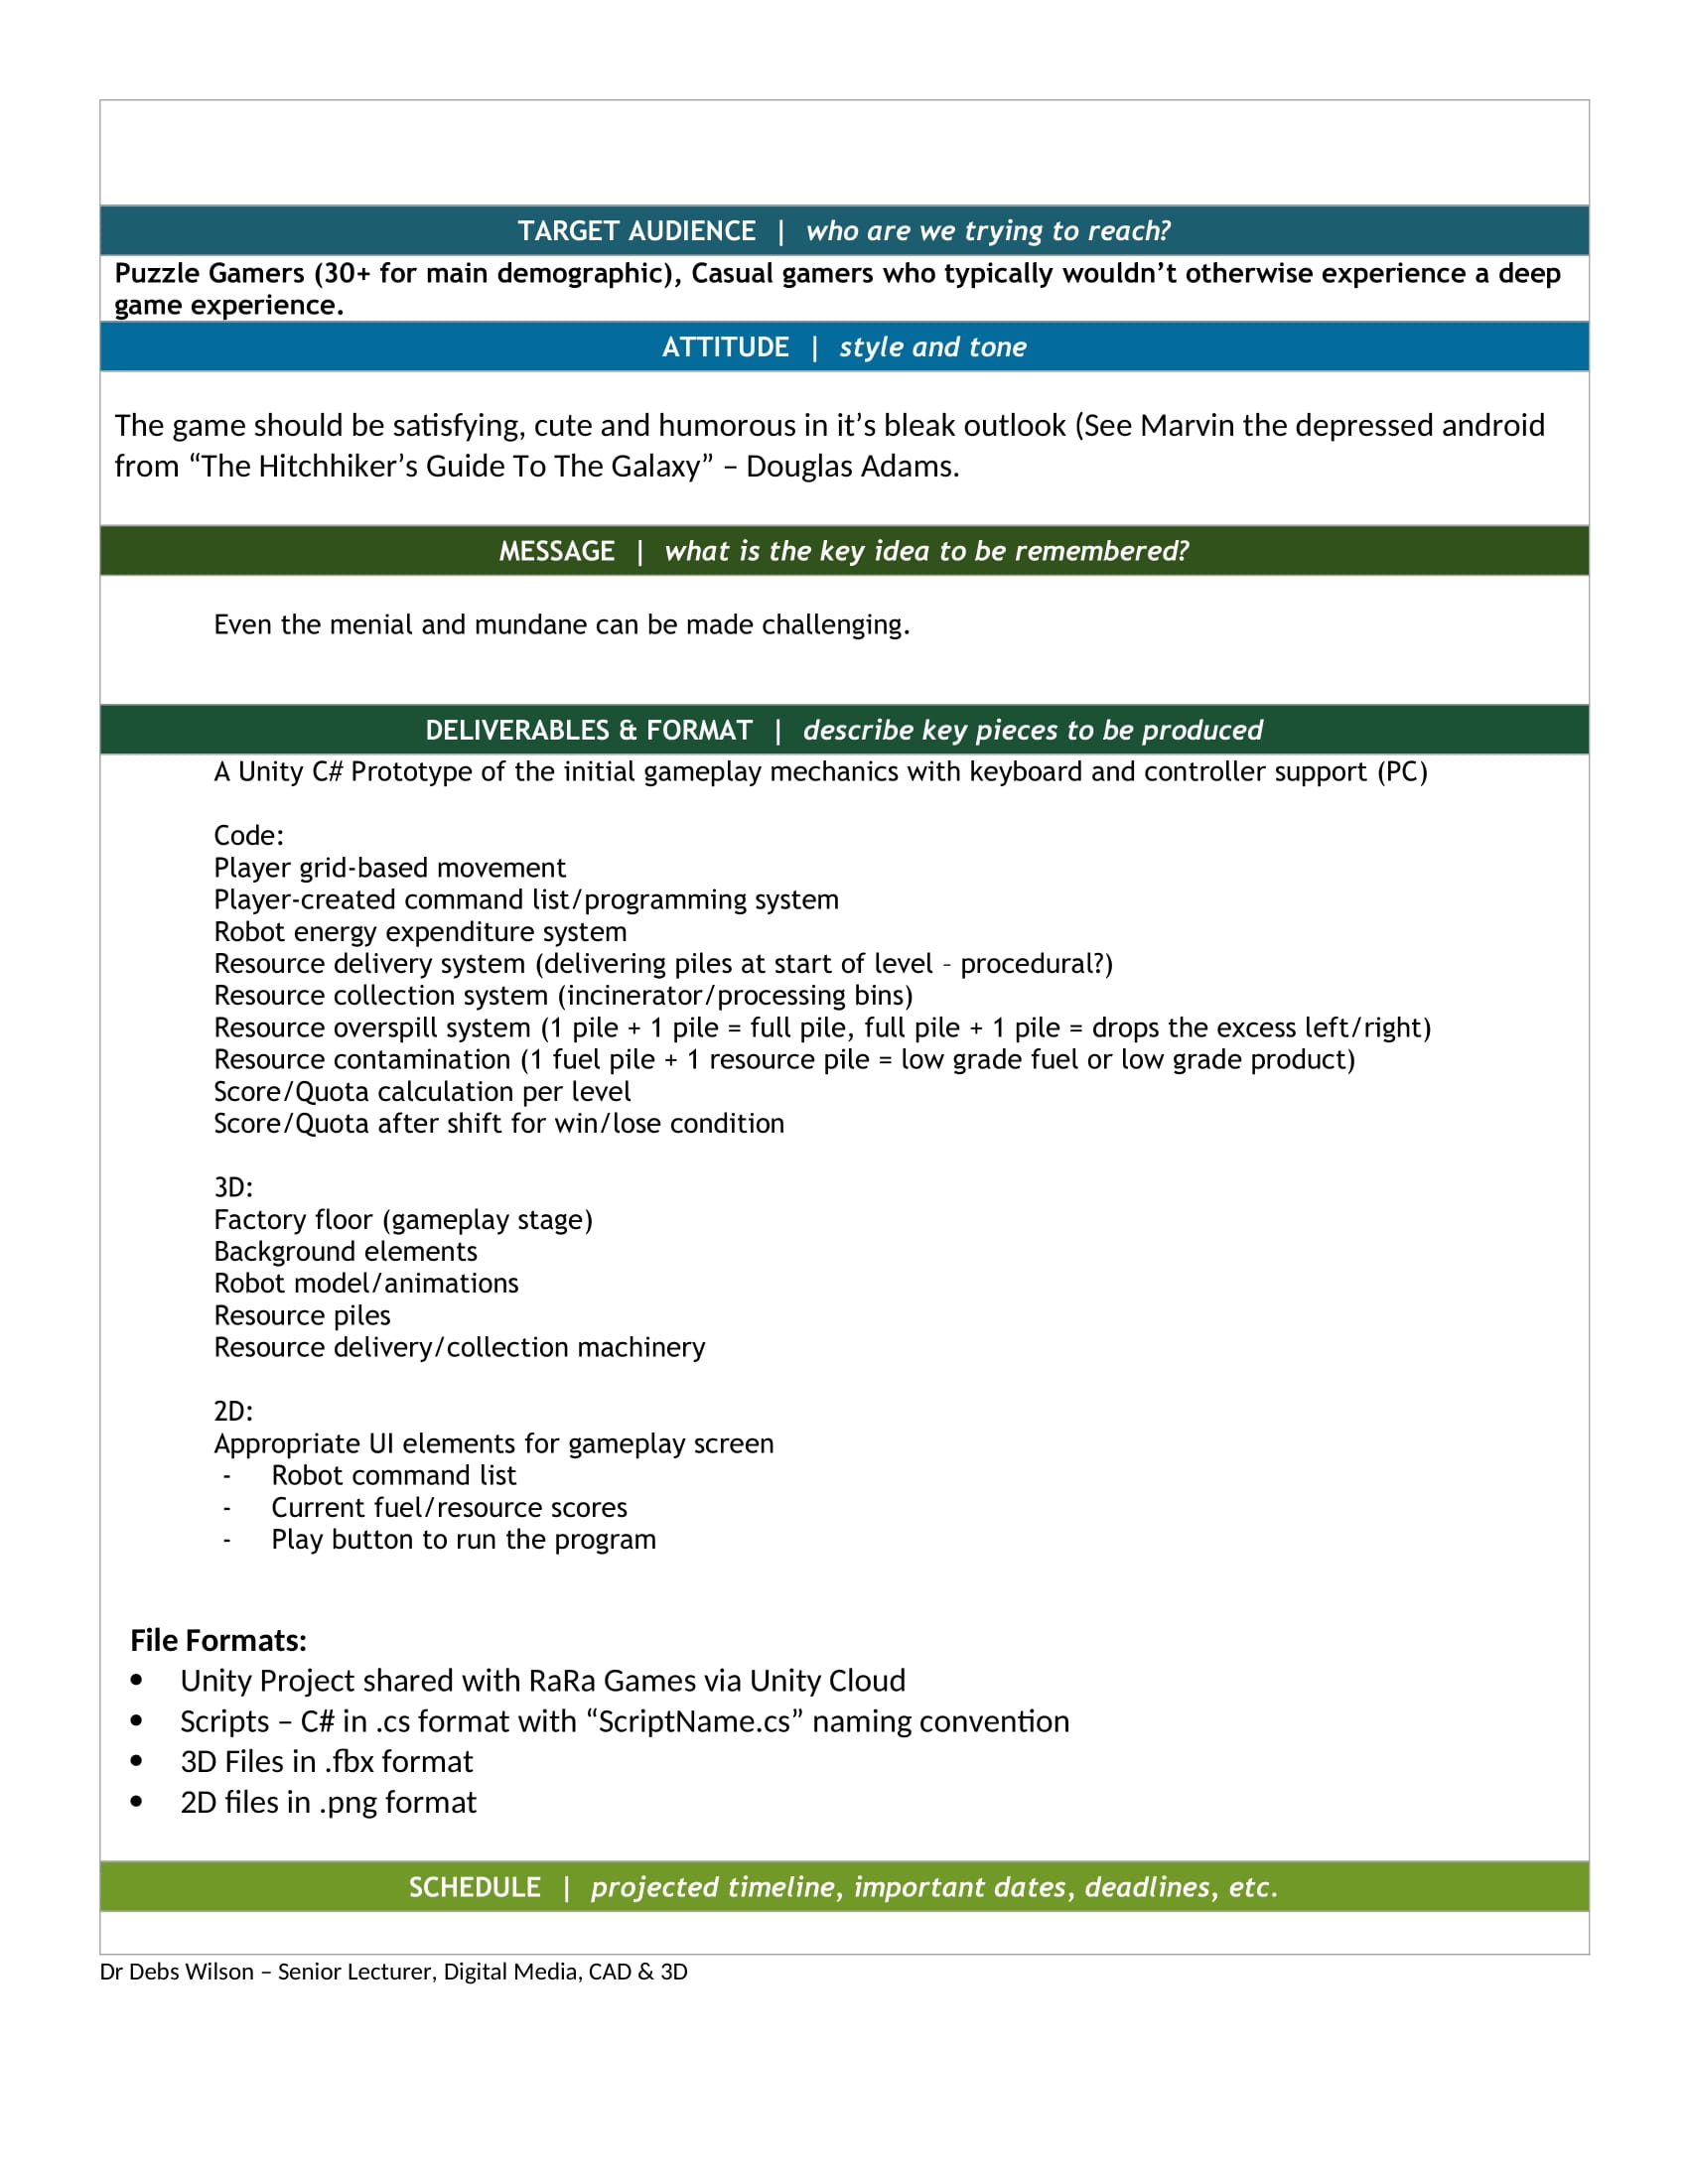
Client Breif Document Part 2
An initial timeline was created to encompass the first few weeks of the project's duration, creating a general outline for potential workflow. This timeline was later extended and modified based on production findings. As speculated, the team found that the initial deadlines were too strict and broad, and they were instead narrowed further and given extended deadlines. The development of the randomised level generation system is to be a larger portion of the workload than initially theorised. This finding hindered later work as its development time cut into that of the player movement.
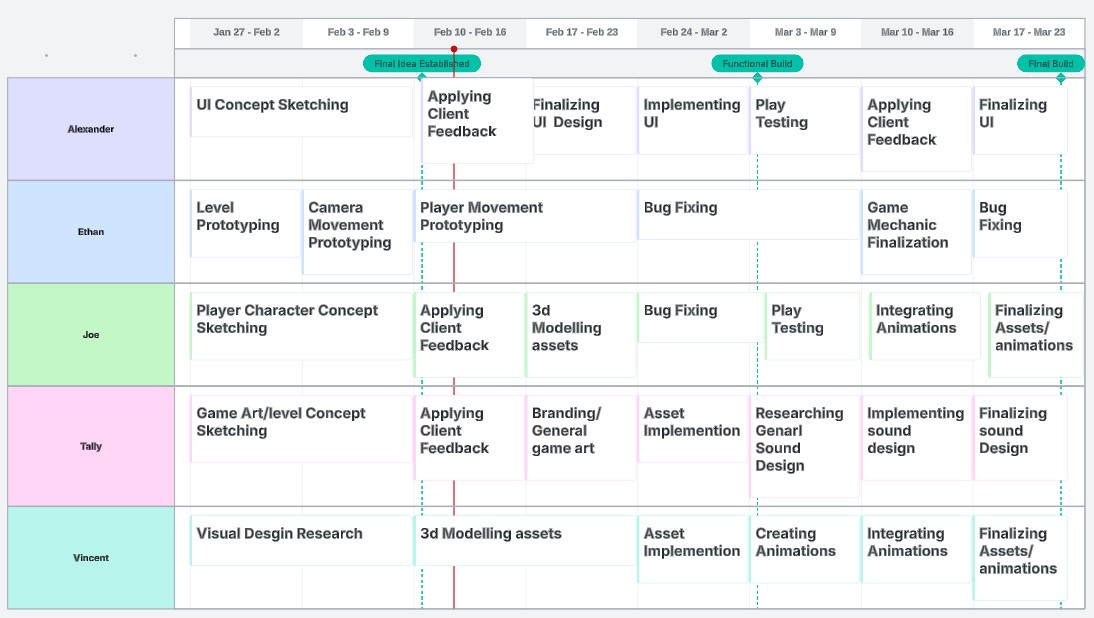
Early Timeline
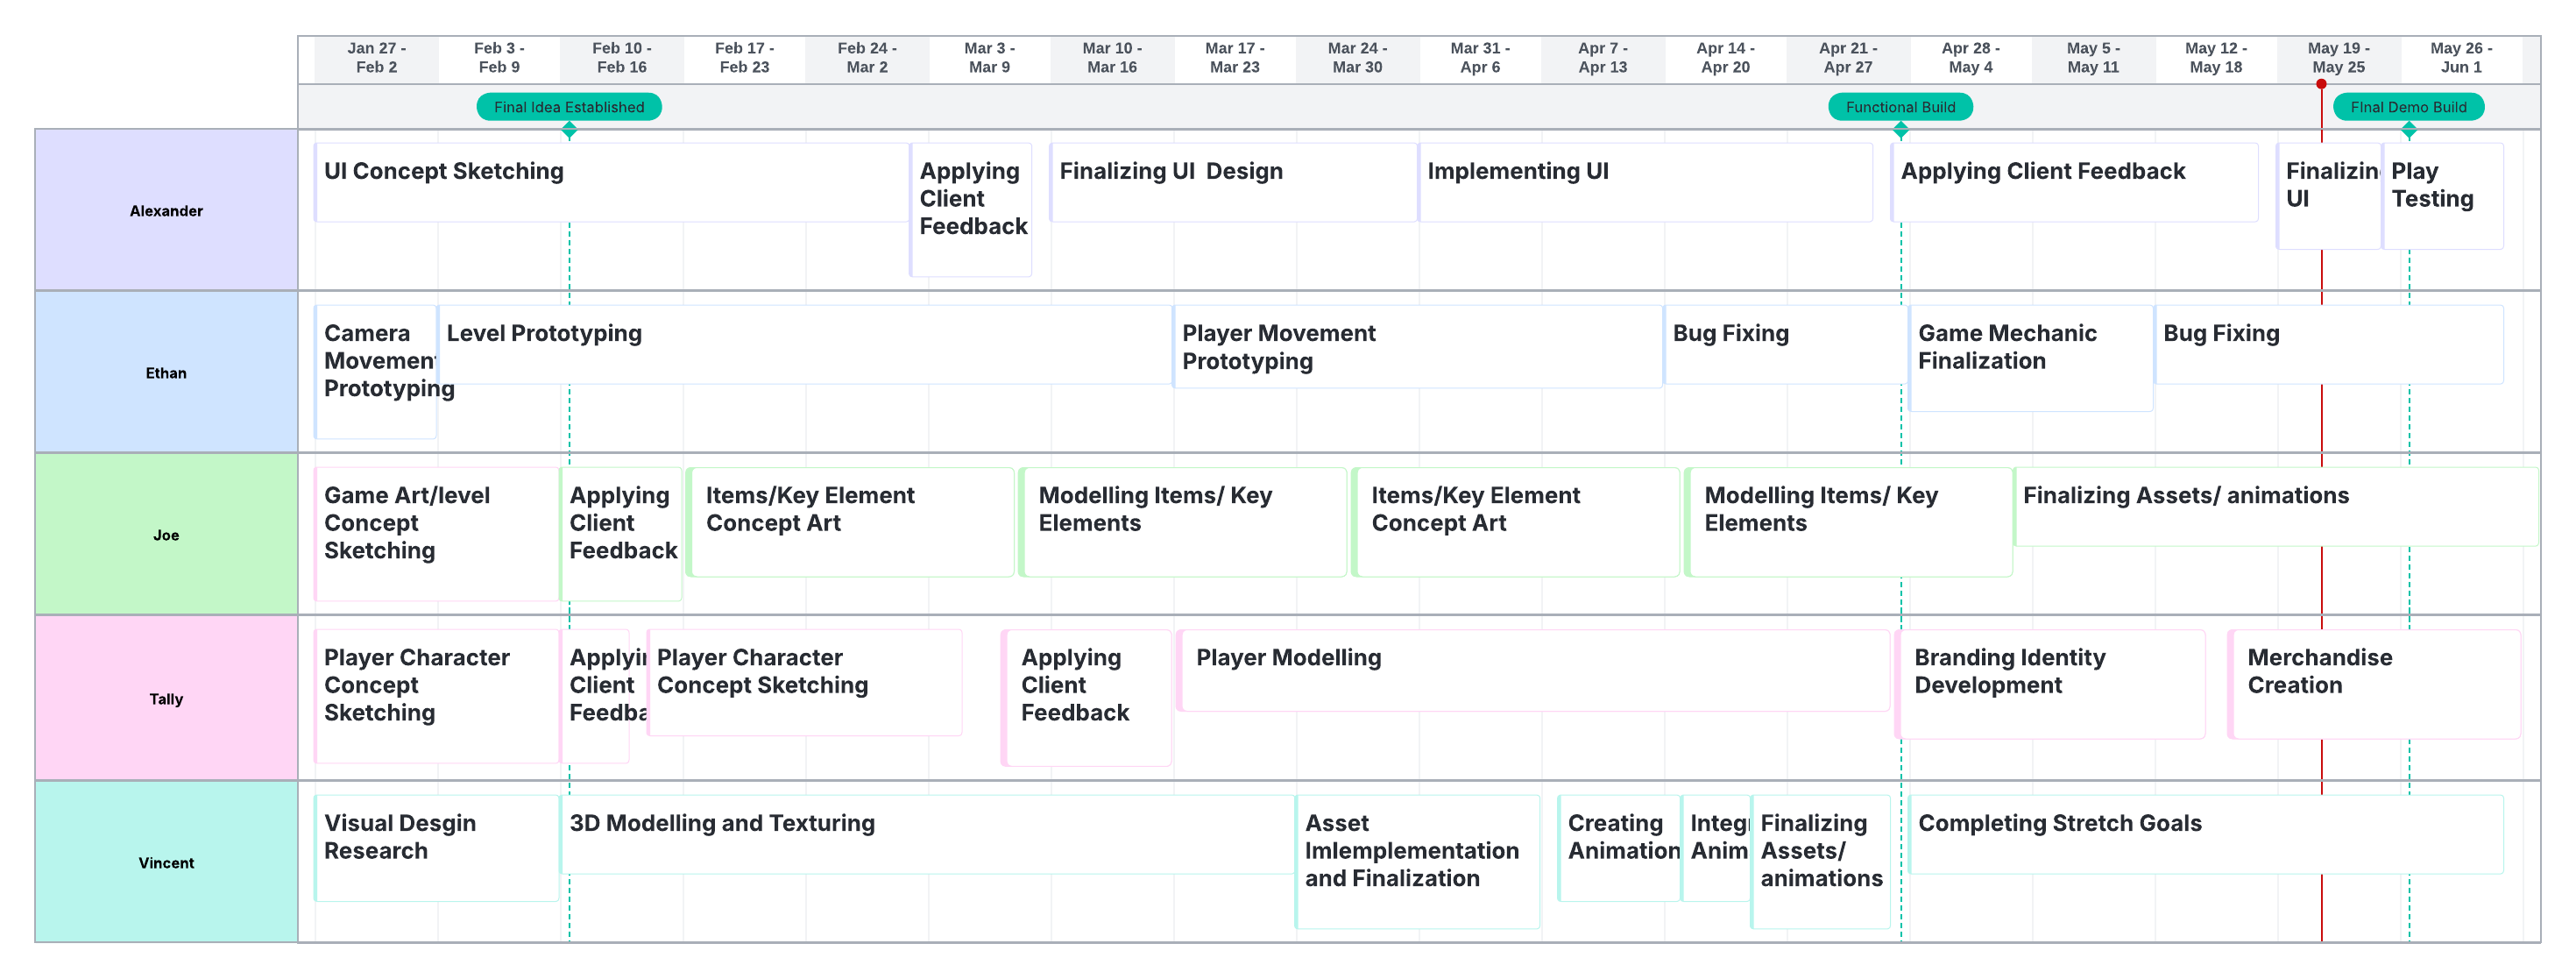
Expanded Timeline
The desired outcome for this project was to provide the client with a functional gameplay demo that demonstrates core gameplay mechanics—the demo aimed to test the core concept and gather user feedback at the Code&Canvas Showcase.
Tools/Programs: Unity, Blender, Visual Studio Code, Adobe Mixamo, Adobe Substance Painter, Adobe Illustrator. Unity was chosen for its familiarity and support for the C# programming language. Blender offered accessible 3D modelling. VS Code was used for scripting. Adobe tools aided in animations, textures, and UI design, aligning with client specifications for format and quality.


Explanation: Unity was the core game engine, enabling scripting within a physics simulation environment. Blender facilitated 3D modelling. VS Code provided a seamless coding interface for Unity and C#. Familiarity with these tools ensured efficiency, meeting client requirements for C# scripting, FBX models, and 2D PNG game elements.
The team’s research approach consisted of understanding the target audience and using similar popular media to influence the world-building of the Game. This was done in an attempt to establish a cohesive concept that builds upon the client's current scope while simultaneously laying a solid foundation for the client’s plans.
Initial insights revealed several unique points of accessibility and accommodation for the target audience, as well as opportunities for world expansion. Revealing that older gamers enjoy puzzle games (Talktalk.co.uk, 2025), it also found that they valued the relaxing qualities and the ability to use critical thinking skills. Another influential finding was that older people primarily played on mobile devices. This information is likely to influence the client's future development plans and modify the target platforms from being PC and Consoles to mobile devices.

Statista Gaming Age Statistics

Statista Gaming Age Statistics
The research was primarily quantitative, drawing from several online sources. Some secondary qualitative research was also gathered from the gameplay demo presented at the Code & Canvas showcase event. User feedback was collected and documented from the event; these notes can be found in Section 7.4, "How Feedback Changed the Project."
Research has shown that UI clarity is a crucial aspect of inclusive design. Emphasing the clear visual language and user feedback. Solutions were discussed with the client to address their concerns, and some features were explored but ultimately cut due to scope limitations.
Research challenges the client’s idea of difficult gameplay, which emphasises a single try. The team found that the target audience valued simplicity, clear visuals, and the game's relaxing properties. While the one try system contrasted these ideas, it was found to be overly complicated, difficult to understand visually, and frustrating.
Early on, the team established a structured and organised approach to collaboration—the setup of collaboration tools, including timelines, GitHub, Discord, and shared file storage. Additionally, meetings were held on Friday to track progress.
Group Discusion Board for Gameplay
The group's lines of communication consisted of three platforms: Discord, Email, and GitHub. Discord served as a general communication hub for all project material and acted as a place to access and review each other's work. Email was primarily used to communicate with the client formally., GitHub was not used further because my personal solo development of the game code did not require collaboration.
The team planned to meet every Tuesday during the scheduled DM2131 session to discuss the current working task and address any concerns the group may have had. Tasks were assigned to each team member based on their preferences and adapted according to their skill set. Tasks would be worked on in collaboration on Friday, while group members discussed the project's direction and progress.
Communication with the client primarily occurred through in-person meetings with the designated university contact, Rob Blofield. These meetings discussed the intended direction of the client's vision and the group's potential execution plans.
In-person meetings, both impromptu and scheduled, were the primary form of communication, alongside Discord and email. However, digital communication was used sparingly, as the team found face-to-face discussions more effective.
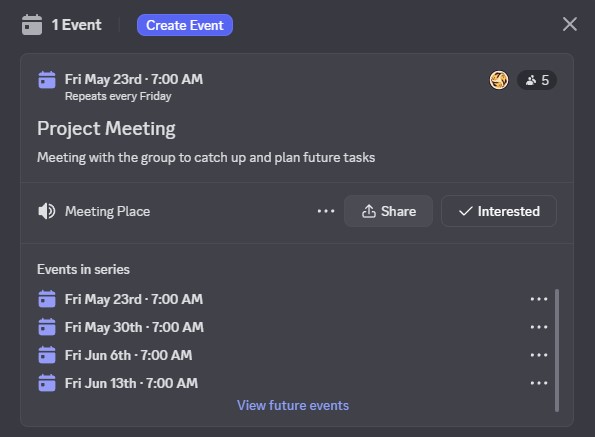
Discord Group Meeting
Weekly meetings were held during the initial 3–5 weeks to establish project direction. Later communication was limited to updates regarding vision changes based on team capacity.
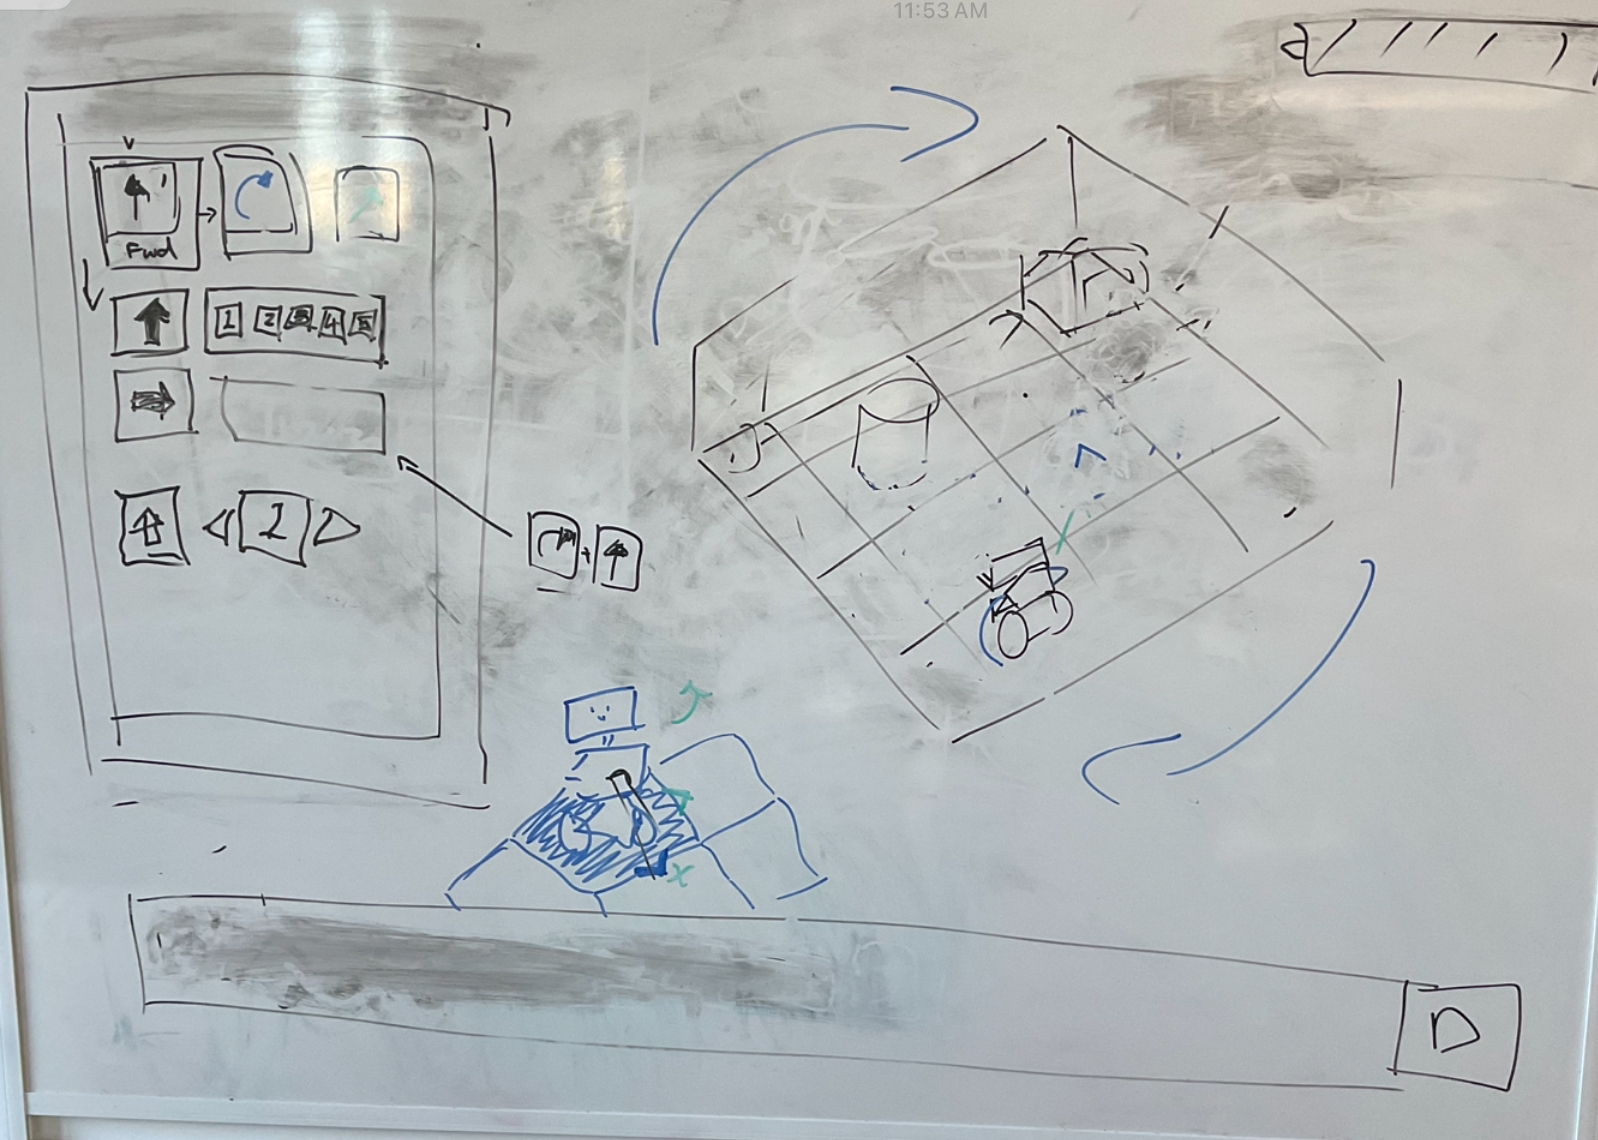
The client emphasised a one-attempt structure, was a point of contention, as the team found this conflicted with the casual, 30+ target audience’s expectations. Although the client remained firm on the “one try” rule, they were open to flexibility in input and visualisation methods. Sketches and internal discussion boards were used to explore and communicate potential solutions.
The client reviewed progress at the Code & Canvas Showcase and highlighted issues with the control scheme, which had been rushed to meet scope constraints. They suggested clearer visual path indicators and distinct schemes for keyboard and controller input. Initially, the team aimed to support both devices simultaneously, but this proved too ambitious.
A combined system was developed, but only keyboard input was fully implemented. Playtesters found controls confusing, confirming the need for further refinement. Based on client feedback, plans were made to simplify the controller system and redesign keyboard navigation for clarity and usability.
The idea's development began with the client’s brief document. From there, the group started fleshing out the game’s world to better understand the visual language and how best to display the client's vision to the player. Research was conducted to determine the game's genre, and it proved to be a good fit for a dystopian story. Ultimately, the group agreed that the client’s vision best aligned with the Huxleyan type of dystopian fiction.
The client provided several resources, such as Schindler’s List and The Hitchhiker’s Guide to the Galaxy, to inspire the game's direction. The group later expanded the vision further, with additional inspiration from the Blocks coding language for gameplay. The language is known for its accessibility and simplicity compared to other coding languages (Makeblock, 2021), which further aligns with the client's target audience of casual gamers, as according to research, they typically have the most enjoyment from complex yet accessible puzzle games, that help them relax yet remain mentally sharp (Talktalk.co.uk, 2025).
Initial Visual Inspiration

Initial Visual Inspiration
Final Visual Inspiration

Final Visual Inspiration
Several earlier ideas would later change due to group discussions with the client and timeline restrictions. The game’s UI/Movement system, which was initially planned to be a drag-and-drop input action system but was later adjusted to use keyboard controls, in an attempt to streamline the development process by bundling the client’s need for controller and keyboard support together. This decision was later reconsidered due to the confusion it caused.
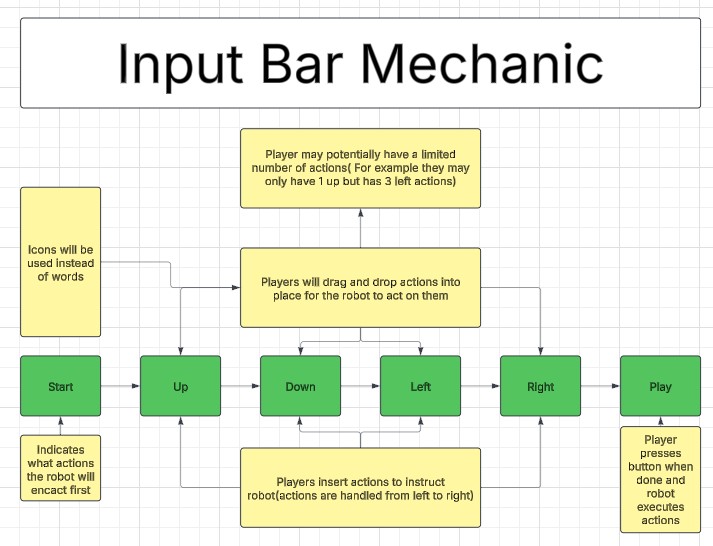
Functionality Chart for Game UI
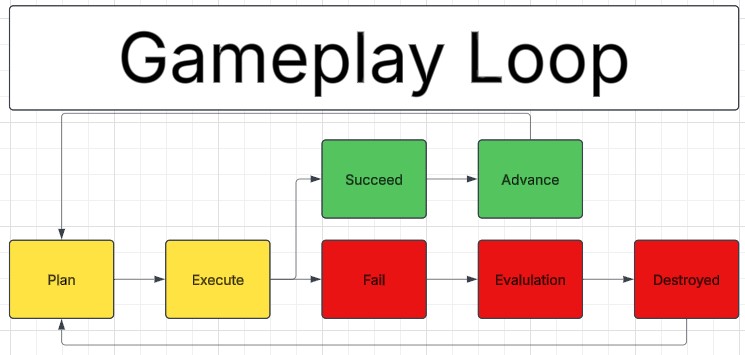
Gameplay Loop Diagram
Feedback was gathered early in the project and provided by the client. Discussions were held to establish the correct art and gameplay direction; these changes and feedback have already been discussed in prior sections. Further feedback was gathered towards the end of the project's duration during the Code & Canvas Showcase event and documented for future client use. Some of the feedback gathered includes:
The primary and ever-present problem was keeping up with the established deadline, especially in game development. The enormous interconnected scope that relied on the previously established mechanics was challenging. Managing the learning of new material and implementing it proved difficult, as did the documentation process that occurred throughout the project.
ButtonNavigator
Allows the player to use the keyboard to navigate the in-game UI.
It gets the player’s key inputs and moves the UI based on the WASD key inputs. Then, it duplicates the game icons and displays them in the button input list.
Early Development
Later Developement
using UnityEngine;
using UnityEngine.UI;
using UnityEngine.EventSystems;
using System.Collections.Generic;
using System.Security.Cryptography;
public class ButtonNavigator : MonoBehaviour
{
// === Serialized Fields for UI Elements ===
public Button[] buttons; // UI buttons selectable from the list
public Transform[] snapPoints; // Points where buttons can be placed
public Transform backgroundImage; // Background UI element for placing buttons
// === Internal State Tracking ===
private int selectedIndex = 0; // Current selected index in the button list
private int snapIndex = 0; // Current snap point index during placement
private int placedButtonIndex = -1; // Index of selected placed button
private GameObject clonedButton; // The button currently being placed
private bool isPlacing = false; // Flag for placing mode
private bool isSelectingPlacedButton = false; // Flag for selecting already placed buttons
private bool[] snapOccupied; // Tracks if a snap point is in use
private List placedButtons = new List(); // List of buttons that have been placed
// === Initialization ===
void Start()
{
snapOccupied = new bool[snapPoints.Length]; // All snap points start as unoccupied
if (buttons.Length > 0)
{
HighlightButton(selectedIndex); // Highlight the first button initially
}
}
// === Main Update Loop: Delegates Input Based on Current Mode ===
void Update()
{
if (isPlacing)
{
HandlePlacementNavigation(); // Navigating snap points while placing
}
else if (isSelectingPlacedButton)
{
HandlePlacedButtonSelection(); // Navigating through placed buttons
}
else
{
HandleButtonSelection(); // Navigating the list of original buttons
}
}
// === Navigation and Selection for Button List ===
void HandleButtonSelection()
{
if (Input.GetKeyDown(KeyCode.W))
{
selectedIndex = (selectedIndex - 1 + buttons.Length) % buttons.Length;
HighlightButton(selectedIndex);
}
else if (Input.GetKeyDown(KeyCode.S))
{
selectedIndex = (selectedIndex + 1) % buttons.Length;
HighlightButton(selectedIndex);
}
else if (Input.GetKeyDown(KeyCode.Space))
{
StartPlacingButton(); // Clone and begin placing the selected button
}
else if (Input.GetKeyDown(KeyCode.A) || Input.GetKeyDown(KeyCode.D))
{
if (placedButtons.Count > 0)
{
placedButtonIndex = 0;
HighlightPlacedButton(placedButtonIndex);
isSelectingPlacedButton = true;
ResetButtonHighlight(); // Clear selection highlight from the list
}
}
}
// === Highlights a Button in the Selection List ===
void HighlightButton(int index)
{
EventSystem.current.SetSelectedGameObject(buttons[index].gameObject);
foreach (Button btn in buttons)
{
btn.GetComponent().color = Color.white;
}
buttons[index].GetComponent().color = Color.yellow;
}
// === Begin the Placement Process for a Selected Button ===
void StartPlacingButton()
{
if (clonedButton != null) return; // Only one clone at a time
clonedButton = Instantiate(buttons[selectedIndex].gameObject);
clonedButton.transform.SetParent(backgroundImage, false);
clonedButton.transform.SetAsLastSibling();
clonedButton.GetComponent GridRotator
Calculates the centre point of the gameplay board’s grid given the dimensions, and then rotates the grid in 90-degree intervals on the player’s input.
Rotation in Action Example 1
Rotation in Action Example 2
Rotation in Action Example 3
using UnityEngine;
using System.Collections;

public class GridRotator : MonoBehaviour
{
    // === Configuration ===
    public float rotationDuration = 0.2f; // Duration of rotation animation in seconds

    // === Internal State ===
    private TileManager tileManager;      // Reference to TileManager script
    private bool isRotating = false;      // Prevents simultaneous rotations
    private float targetRotationY = 0f;   // Target Y rotation in degrees

    // === Initialization ===
    void Start()
    {
        tileManager = GetComponent();

        if (tileManager == null)
        {
            Debug.LogError("TileManager not found! Attach GridRotator to the same GameObject as TileManager.");
        }

        targetRotationY = transform.eulerAngles.y; // Set initial rotation value
    }

    // === Frame Update ===
    void Update()
    {
        HandleRotation(); // Process input for rotation
    }

    // === Input Handling for Rotation ===
    void HandleRotation()
    {
        if (isRotating) return; // Block input while rotating

        if (Input.GetKeyDown(KeyCode.Q))
        {
            targetRotationY -= 90f; // Rotate left
            StartCoroutine(SnapRotate());
        }
        else if (Input.GetKeyDown(KeyCode.E))
        {
            targetRotationY += 90f; // Rotate right
            StartCoroutine(SnapRotate());
        }
    }

    // === Smooth Rotation Animation ===
    private IEnumerator SnapRotate()
    {
        isRotating = true;

        float currentRotationY = transform.eulerAngles.y;
        float elapsedTime = 0f;

        // Compute the center of the grid for rotation
        Vector3 center = new Vector3((tileManager.gridWidth - 1) / 2f, 0, (tileManager.gridHeight - 1) / 2f);

        while (elapsedTime < rotationDuration)
        {
            elapsedTime += Time.deltaTime;
            float newY = Mathf.LerpAngle(currentRotationY, targetRotationY, elapsedTime / rotationDuration);

            // Apply smooth rotation around grid center
            transform.RotateAround(center, Vector3.up, newY - transform.eulerAngles.y);
            yield return null;
        }

        // Snap to exact target rotation to correct any interpolation errors
        transform.RotateAround(center, Vector3.up, targetRotationY - transform.eulerAngles.y);
        isRotating = false;
    }
}
PlayerAction
It stores movement values within the required UI elements necessary for movement.
Stores movement values as a serialised field editable from the inspector, allowing easy access to changes between the objects the script is attached to.
                public class PlayerAction : MonoBehaviour
{
    // === Enumerations for Player Movement Options ===
    public enum TurnDirection { None, Turn90, Turn180 }
    public enum TurnSide { Left, Right }                  // Which way to turn
    public enum MoveDirection { Forward, Backward }       // Which way to move

    // === Configurable Action Settings ===
    public TurnDirection turnDirection;                   // Type of rotation (None, 90°, 180°)
    public TurnSide turnSide = TurnSide.Right;            // Direction of rotation (default: Right)
    public MoveDirection moveDirection;                   // Direction of movement
    public float moveDistance = 1f;                       // How far to move
    public float turnSpeed = 90f;                         // Degrees per second while turning
    public float moveSpeed = 2f;                          // Units per second while moving

    // === Action Execution Coroutine ===
    public IEnumerator ExecuteAction(Transform target)
    {
        // --- Handle Rotation ---
        if (turnDirection != TurnDirection.None)
        {
            float targetAngle = (turnDirection == TurnDirection.Turn90) ? 90f : 180f;
            float rotated = 0f;

            float turnMultiplier = (turnSide == TurnSide.Right) ? 1f : -1f;

            while (rotated < targetAngle)
            {
                float step = turnSpeed * Time.deltaTime;
                target.Rotate(0f, step * turnMultiplier, 0f);
                rotated += step;
                yield return null;
            }
        }

        // --- Handle Movement ---
        if (moveDistance > 0)
        {
            Vector3 direction = (moveDirection == MoveDirection.Forward) ? target.forward : -target.forward;
            Vector3 startPos = target.position;
            Vector3 endPos = startPos + direction * moveDistance;

            float t = 0f;
            while (t < 1f)
            {
                t += Time.deltaTime * (moveSpeed / moveDistance);
                target.position = Vector3.Lerp(startPos, endPos, t);
                yield return null;
            }
        }
    }
}
PlayerActionExecutor
Reads the stored movement values and executes them upon the player's command.
IGets the player action script, reads the defined values, finds the player object, executes the player’s movement command when prompted by the player, and finally resets the UI, removing all previous actions (only applicable for demo, not representative of the final game)
using UnityEngine;
using System.Collections;
using System.Collections.Generic;

public class PlayerActionExecutor : MonoBehaviour
{
    // === Configuration ===
    public string playerTag = "Player";                  // Tag used to find the player object
    public Transform actionContainer;                    // Parent object containing PlayerAction components

    // === Runtime State ===
    private Transform player;                            // Cached player transform
    private bool isExecuting = false;                    // Prevents multiple executions at once

    // === Input Trigger ===
    void Update()
    {
        if (Input.GetKeyDown(KeyCode.T) && !isExecuting)
        {
            Debug.Log("Starting coroutine to execute player actions...");
            StartCoroutine(Execute());
        }
    }

    // === Main Execution Coroutine ===
    IEnumerator Execute()
    {
        isExecuting = true;

        // --- Wait until player object is available ---
        while (player == null)
        {
            GameObject playerObj = GameObject.FindGameObjectWithTag(playerTag);
            if (playerObj != null)
            {
                player = playerObj.transform;
                Debug.Log("Player detected: " + player.name);
            }
            else
            {
                yield return null; // Wait a frame and try again
            }
        }

        // --- Collect and execute all PlayerAction components ---
        PlayerAction[] actions = actionContainer.GetComponentsInChildren();
        Debug.Log($"Found {actions.Length} PlayerAction components. Starting execution...");

        foreach (PlayerAction action in actions)
        {
            Debug.Log("Executing action: " + action.name);
            yield return StartCoroutine(action.ExecuteAction(player));
        }

        Debug.Log("Finished executing all player actions.");

        // --- Cleanup UI after execution ---
        DeleteAllChildren();

        isExecuting = false;
    }

    // === Utility: Cleanup Action UI ===
    private void DeleteAllChildren()
    {
        foreach (Transform child in actionContainer)
        {
            Destroy(child.gameObject);
        }
        Debug.Log("All child objects of actionContainer have been deleted.");
    }
}
PlayerMovementVisual
An early development script designed for an alternative movement system displays a cursor on the selected tile.
Instantiates a 3d cursor object on the current selected tile based on the current mouse location(disabled in the latest build)

Visual Indicator in Action
using System.Collections;
using System.Collections.Generic;
using UnityEngine;

public class PlayerMovementVisual : MonoBehaviour
{
    // === Configuration ===
    public GameObject indicatorPrefab; // Prefab to visually indicate the hovered tile

    // === Runtime References ===
    private GameObject indicatorInstance;
    private TileManager tileManager;

    // === Initialization ===
    void Start()
    {
        // Locate TileManager in the scene
        tileManager = FindObjectOfType();
        if (tileManager == null)
        {
            Debug.LogError("TileManager not found in the scene!");
            return;
        }

        // Create indicator instance from prefab
        if (indicatorPrefab != null)
        {
            indicatorInstance = Instantiate(indicatorPrefab);
            indicatorInstance.SetActive(false); // Hide initially
        }
        else
        {
            Debug.LogError("Indicator Prefab not assigned!");
        }
    }


    void Update()
    {
        UpdateIndicatorPosition();
    }

    // === Visual Feedback: Update Indicator ===
    private void UpdateIndicatorPosition()
    {
        Ray ray = Camera.main.ScreenPointToRay(Input.mousePosition);
        RaycastHit hit;

        if (Physics.Raycast(ray, out hit))
        {
            // Show indicator above a tile if hit
            if (hit.collider.CompareTag("Tile"))
            {
                Vector3 tilePosition = hit.collider.transform.position;
                Vector3 indicatorPosition = new Vector3(tilePosition.x, tilePosition.y + 1f, tilePosition.z);

                indicatorInstance.transform.position = indicatorPosition;
                indicatorInstance.SetActive(true);
            }
            else
            {
                indicatorInstance.SetActive(false); // Not a tile
            }
        }
        else
        {
            indicatorInstance.SetActive(false); // No hit
        }
    }
}
SpawnObjects
Spawns player, intended to spawn all game objects on the board in future.
Once generated, it finds the grid, then finds the designated spawn point(which can be set in the inspector), and instantiates the player on the tile.
using System.Collections;
using System.Collections.Generic;
using UnityEngine;

public class SpawnObjects : MonoBehaviour
{
    // === Configuration ===
    [Header("Player Settings")]
    public GameObject playerPrefab;       // Prefab to spawn as the player
    public float spawnHeight = 0.75f;     // Y offset for the spawn position

    // === Runtime State ===
    private TileManager tileManager;
    private Vector3 playerStartPosition;
    private List availableTiles = new List();

    // === Initialization ===
    void Start()
    {
        tileManager = FindObjectOfType();

        if (tileManager == null)
        {
            Debug.LogError("TileManager not found in the scene!");
            return;
        }

        StartCoroutine(WaitForWallsAndSpawn());
    }

    // === Coroutine: Wait until the grid is ready ===
    private IEnumerator WaitForWallsAndSpawn()
    {
        while (!tileManager.AreWallsPlaced)
        {
            yield return null;
        }

        playerStartPosition = tileManager.GetPlayerStartPosition();
        SpawnPlayer();

        // Reserve the player's spawn tile
        availableTiles.Remove(playerStartPosition);
    }

    // === Player Instantiation ===
    private void SpawnPlayer()
    {
        if (playerPrefab == null)
        {
            Debug.LogError("Player Prefab is not assigned in the Inspector!");
            return;
        }

        Vector3 adjustedPosition = new Vector3(playerStartPosition.x, spawnHeight, playerStartPosition.z);
        Debug.Log($"Spawning player at: {adjustedPosition}");

        GameObject player = Instantiate(playerPrefab, adjustedPosition, Quaternion.identity);

        // Optional: parent to tile manager for organization
        player.transform.SetParent(tileManager.transform);
    }
}
TileManager
It handles all level generation, player pathing, and key gameplay item spawning, and visually displays the level generation process.
Procedurally generates a grid-based tile map, populates the area with walls, obstacles and key items, and outlines player paths to ensure possible level completion/preventing path conflicts. It also manages the falling animations of the game’s level generation via a coroutine.
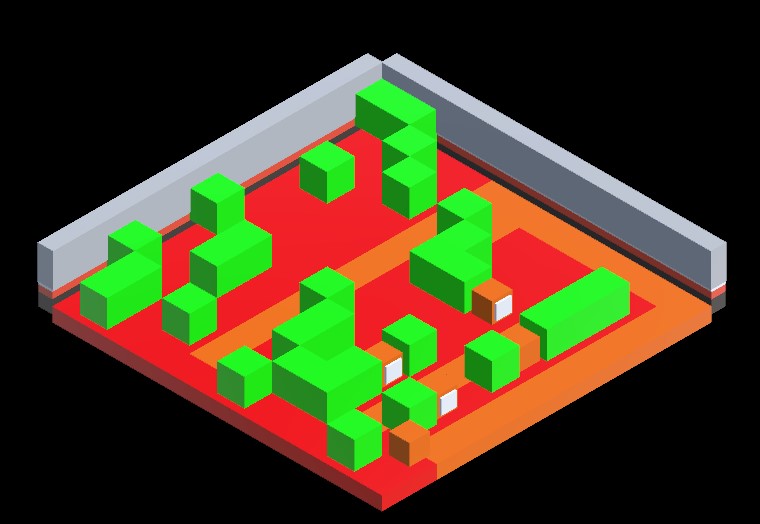
Floor Generation
Floor & Wall generation

Generation using tile models
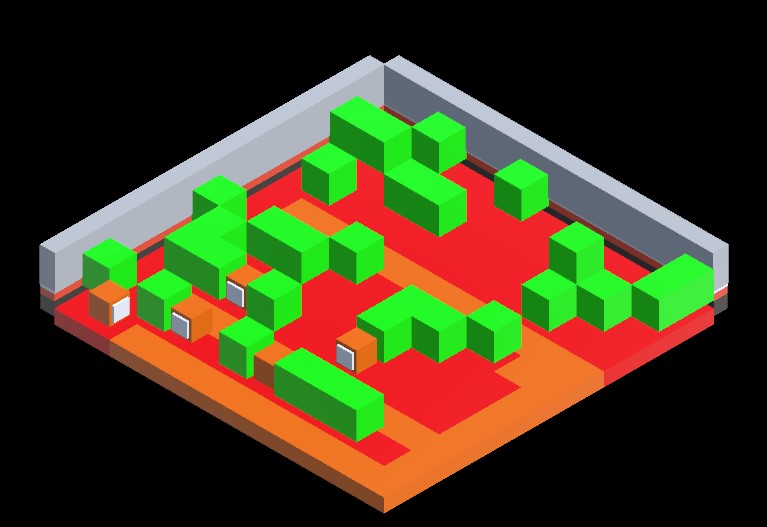
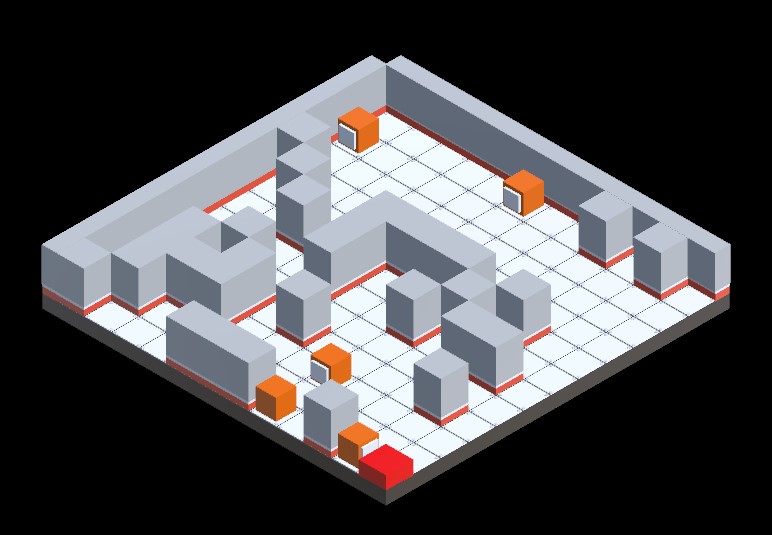
Pathing & Item Generation Example 1
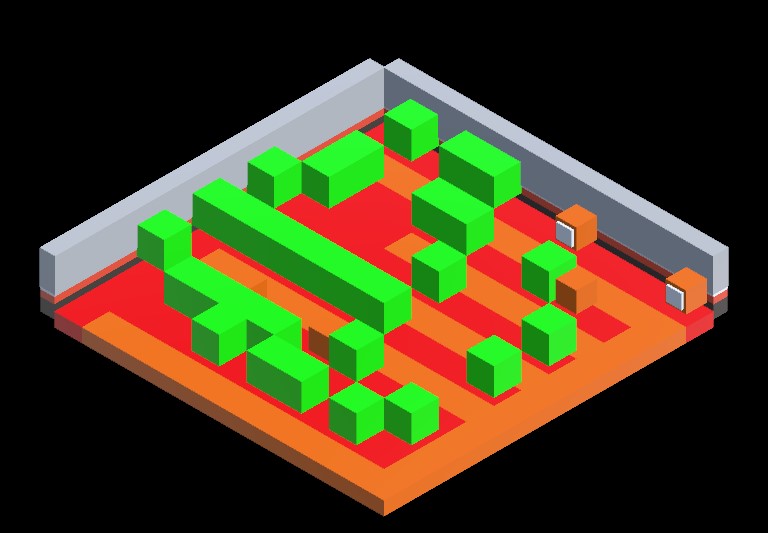
Pathing & Item Generation Example 2
Pathing & Item Generation Example 3
Demo Test Level Example 1

Demo Test Level Example 2
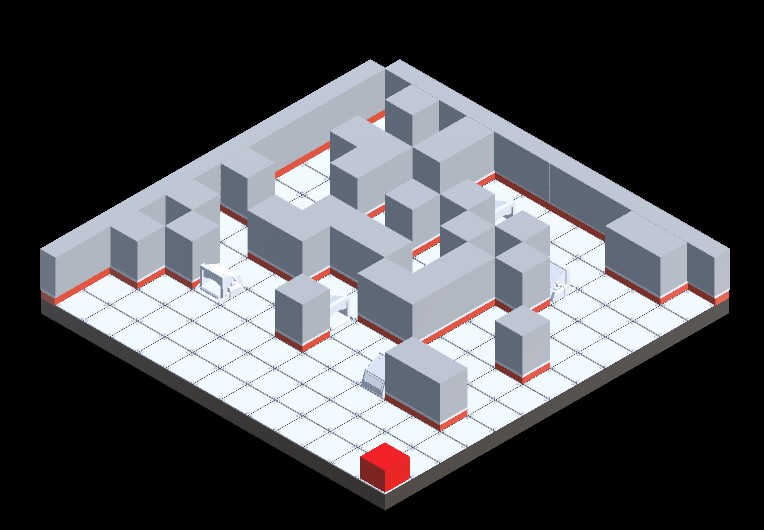
Demo Test Level Example 3
using System.Collections;
using System.Collections.Generic;
using System.Linq;
using UnityEngine;

public class TileManager : MonoBehaviour
{
    public static HashSet walkableTiles = new HashSet();
    public int gridWidth = 12, gridHeight = 12;
    public GameObject tilePrefab;
    public float totalFallTime = 5f;
    public float fallHeight = 10f;
    public GameObject wallPrefab;
    public Material startTileMaterial, pathMaterial, highlightMaterial;
    private Vector3Int startTile, endTile;
    public float obstacleFallHeight = 10f;  // Fall height for obstacles
    public float wallFallHeight = 10f;      // Fall height for walls
    public GameObject TestEndDestination;


    [System.Serializable]
    public class KeyItemSpawn
    {
        public GameObject keyItemPrefab; // The key item prefab to spawn
        public int minCount; // Minimum number of this key item to spawn
        public int maxCount; // Maximum number of this key item to spawn
    }


    [Header("Path Settings")]
    public int numberOfPaths = 1;

    [Header("Item Settings")]
    public int keyItemCount = 3;
    public KeyItemSpawn[] keyItems; // Array of key item types

    [Header("Obstacle Settings")]
    public int obstacleCount = 10;
    public GameObject obstaclePrefab;

    public bool AreWallsPlaced { get; private set; } = false;
    public Vector3 playerStartPosition;
    private bool firstTilePlaced = false;

    private HashSet pathTiles = new HashSet();
    private List> allPaths = new List>();
    private HashSet validPath = new HashSet(); // Changed from List to HashSet for efficiency
    public float obstacleEndHeight = 0.75f;  // End position height for obstacles (default or set in Unity)
    public float wallEndHeight = 0.5f;       // End position height for walls (default or set in Unity)
    [SerializeField] private float placementHeight = 0.5f;  // Variable for adjusting placement height


    public Vector3 GetPlayerStartPosition() => playerStartPosition;

    public void RegisterTile(Vector3Int position)
    {
        walkableTiles.Add(position);
    }

    public static bool IsWalkable(Vector3Int position)
    {
        return walkableTiles.Contains(position);
    }

    private void Start()
    {
        GenerateGrid();
    }

    void GenerateGrid()
    {
        StartCoroutine(GenerateTiles());
    }

    private IEnumerator GenerateTiles()
    {
        List allTiles = new List();
        int totalTiles = gridWidth * gridHeight;
        float delayBetweenTiles = totalFallTime / totalTiles;

        for (int x = 0; x < gridWidth; x++)
        {
            for (int z = 0; z < gridHeight; z++)
            {
                Vector3Int tilePos = new Vector3Int(x, 0, z);
                allTiles.Add(tilePos);

                Vector3 position = new Vector3(x, fallHeight, z);
                GameObject newTile = Instantiate(tilePrefab, position, Quaternion.identity, transform);
                RegisterTile(tilePos);

                if (!firstTilePlaced)
                {
                    startTile = tilePos;
                    firstTilePlaced = true;
                    Debug.Log($"Start Tile: {startTile}");

                    if (startTileMaterial != null)
                    {
                        Renderer tileRenderer = newTile.GetComponent();
                        if (tileRenderer != null) tileRenderer.material = startTileMaterial;
                    }
                }

                newTile.name = $"Tile_{x}_{z}";
                StartCoroutine(FallToPosition(newTile, new Vector3(x, 0, z)));
                yield return new WaitForSeconds(delayBetweenTiles);
            }
        }

        // Now generate multiple paths and save them to allPaths
        allPaths = GenerateMultiplePaths(startTile, numberOfPaths);

        // Highlight all paths
        foreach (var path in allPaths)
        {
            foreach (Vector3Int tile in path)
            {
                GameObject tileObj = transform.Find($"Tile_{tile.x}_{tile.z}")?.gameObject;
                if (tileObj != null && pathMaterial != null)
                {
                    Renderer tileRenderer = tileObj.GetComponent();
                    if (tileRenderer != null)
                    {
                        tileRenderer.material = pathMaterial;
                    }
                }
            }
        }

        // Ensure paths exist before placing key items
        if (allPaths.Count > 0)
        {
            // Get the last path's last tile
            endTile = allPaths[allPaths.Count - 1].Last();

            // Check if the tile is NOT at (0, 0)
            if (endTile.x != 0 || endTile.z != 0)
            {
                if (TestEndDestination != null)
                {
                    Vector3 spawnPosition = new Vector3(endTile.x + 0.5f, placementHeight, endTile.z + 0.5f);
                    Instantiate(TestEndDestination, spawnPosition, Quaternion.identity, transform);
                    Debug.Log($"Spawned TestEndDestination at {spawnPosition}");
                }
                else
                {
                    Debug.LogWarning("TestEndDestination is not assigned in the Inspector.");
                }
            }
            else
            {
                Debug.Log("Skipping spawn because end tile is at (0,0)");
            }
        }

        // Now place obstacles, passing allTiles to PlaceObstacles
        yield return StartCoroutine(PlaceObstacles(allTiles));
        PlaceKeyItems();
        StartCoroutine(GenerateWalls());
    }


    private IEnumerator GenerateWalls()
    {
        float wallOffset = 0.75f;
        float delayBetweenWalls = totalFallTime / (2 * gridWidth + 2 * gridHeight);

        // Create walls along the x-axis (left and right walls)
        for (int x = 0; x < gridWidth; x++)
        {
            Vector3 position = new Vector3(x, fallHeight, -wallOffset);  // Start position at fallHeight
            GameObject wall = Instantiate(wallPrefab, position, Quaternion.Euler(0, 90, 0), transform);
            StartCoroutine(FallToPosition(wall, new Vector3(x, wallEndHeight, -wallOffset)));  // Fall to custom end height for walls
            yield return new WaitForSeconds(delayBetweenWalls);
        }

        // Create walls along the z-axis (top and bottom walls)
        for (int z = 0; z < gridHeight; z++)
        {
            Vector3 position = new Vector3(gridWidth - 1 + wallOffset, fallHeight, z);  // Start position at fallHeight
            GameObject wall = Instantiate(wallPrefab, position, Quaternion.identity, transform);
            StartCoroutine(FallToPosition(wall, new Vector3(gridWidth - 1 + wallOffset, wallEndHeight, z)));  // Fall to custom end height for walls
            yield return new WaitForSeconds(delayBetweenWalls);
        }

        // Create walls along the x-axis (right and left edges)
        for (int x = gridWidth - 1; x >= 0; x--)
        {
            Vector3 position = new Vector3(x, fallHeight, gridHeight - 1 + wallOffset);  // Start position at fallHeight
            GameObject wall = Instantiate(wallPrefab, position, Quaternion.Euler(0, 90, 0), transform);
            StartCoroutine(FallToPosition(wall, new Vector3(x, wallEndHeight, gridHeight - 1 + wallOffset)));  // Fall to custom end height for walls
            yield return new WaitForSeconds(delayBetweenWalls);
        }

        // Create walls along the z-axis (bottom and top edges)
        for (int z = gridHeight - 1; z >= 0; z--)
        {
            Vector3 position = new Vector3(-wallOffset, fallHeight, z);  // Start position at fallHeight
            GameObject wall = Instantiate(wallPrefab, position, Quaternion.identity, transform);
            StartCoroutine(FallToPosition(wall, new Vector3(-wallOffset, wallEndHeight, z)));  // Fall to custom end height for walls
            yield return new WaitForSeconds(delayBetweenWalls);
        }

        yield return null;
        AreWallsPlaced = true;
        Debug.Log("All walls have been placed!");
    }


    private Vector3Int SelectEndTile(Vector3Int start)
    {
        int minDistance = Mathf.Max(gridWidth, gridHeight) / 2;
        Vector3Int chosenTile;

        do
        {
            chosenTile = new Vector3Int(Random.Range(0, gridWidth), 0, Random.Range(0, gridHeight));
        } while (Vector3Int.Distance(start, chosenTile) < minDistance ||
                 !GeneratePath(start, chosenTile).Contains(chosenTile));

        return chosenTile;
    }

    private HashSet GeneratePath(Vector3Int start, Vector3Int end)
    {
        HashSet path = new HashSet();
        Queue queue = new Queue();
        Dictionary cameFrom = new Dictionary();

        queue.Enqueue(start);
        cameFrom[start] = start;

        Vector3Int[] directions = { Vector3Int.right, Vector3Int.left, Vector3Int.forward, Vector3Int.back };

        while (queue.Count > 0)
        {
            Vector3Int current = queue.Dequeue();
            if (current == end) break;

            foreach (var dir in directions)
            {
                Vector3Int next = current + dir;
                if (walkableTiles.Contains(next) && !cameFrom.ContainsKey(next))
                {
                    queue.Enqueue(next);
                    cameFrom[next] = current;
                }
            }
        }

        if (!cameFrom.ContainsKey(end))
        {
            Debug.LogError("No valid path found!");
            return new HashSet();
        }

        Vector3Int step = end;
        while (step != start)
        {
            path.Add(step);
            step = cameFrom[step];
        }
        path.Add(start);

        Debug.Log($"Generated path with {path.Count} tiles.");
        return path;
    }

    private IEnumerator PlaceObstacles(List allTiles)
    {
        HashSet pathTiles = new HashSet();

        // Use the stored paths instead of regenerating
        foreach (var path in allPaths)
        {
            pathTiles.UnionWith(path);
        }

        List possibleSpots = new List(allTiles);
        possibleSpots.RemoveAll(tile => pathTiles.Contains(tile));

        int placedObstacles = 0;
        int maxAttempts = 1000;

        while (placedObstacles < obstacleCount && possibleSpots.Count > 0 && maxAttempts > 0)
        {
            maxAttempts--;  // Decrease attempts

            int randIndex = Random.Range(0, possibleSpots.Count);
            Vector3Int obstacleTile = possibleSpots[randIndex];
            possibleSpots.RemoveAt(randIndex);

            // Check if the tile is mistakenly on a path
            if (pathTiles.Contains(obstacleTile))
            {
                Debug.LogError($"ERROR: Attempted to place obstacle on path {obstacleTile}!");
                continue;
            }

            // Create the obstacle at a custom height
            Vector3 startPosition = new Vector3(obstacleTile.x, fallHeight, obstacleTile.z);  // Starting height for obstacles
            GameObject obstacle = Instantiate(obstaclePrefab, startPosition, Quaternion.identity, transform);

            // Register the obstacle position
            RegisterObstacle(obstacleTile);

            // Use the FallToPosition coroutine to move it down to the desired target height
            StartCoroutine(FallToPosition(obstacle, new Vector3(obstacleTile.x, obstacleEndHeight, obstacleTile.z)));  // Custom end height for obstacles

            placedObstacles++;


            yield return new WaitForSeconds(totalFallTime / obstacleCount);
        }

        if (maxAttempts <= 0)
        {
            Debug.LogError("Max attempts reached while trying to place obstacles!");
        }

        Debug.Log($"Placed {placedObstacles} obstacles.");
    }


    private HashSet obstacleTiles = new HashSet();

    private void PlaceKeyItems()
    {
        if (allPaths.Count == 0)
        {
            Debug.LogError("No valid path available for key item placement.");
            return;
        }

        HashSet validAdjacentTiles = new HashSet();
        HashSet keyItemTiles = new HashSet();
        HashSet allPathTiles = new HashSet();

        foreach (var path in allPaths)
        {
            allPathTiles.UnionWith(path);
        }

        Debug.Log($"Total number of path tiles: {allPathTiles.Count}");

        foreach (var pathTile in allPathTiles)
        {
            Vector3Int[] adjacentTiles = new Vector3Int[]
            {
            pathTile + Vector3Int.right,
            pathTile + Vector3Int.left,
            pathTile + Vector3Int.forward,
            pathTile + Vector3Int.back
            };

            foreach (var adjacentTile in adjacentTiles)
            {
                if (IsWalkable(adjacentTile) &&
                    !allPathTiles.Contains(adjacentTile) &&
                    !obstacleTiles.Contains(adjacentTile) &&
                    !keyItemTiles.Contains(adjacentTile))
                {
                    validAdjacentTiles.Add(adjacentTile);
                }
            }
        }

        if (validAdjacentTiles.Count == 0)
        {
            Debug.LogError("No valid adjacent tiles found to place key items!");
            return;
        }

        List adjacentTileList = validAdjacentTiles.ToList();
        ShuffleList(adjacentTileList); // Shuffle tiles for randomness

        foreach (var keyItem in keyItems)
        {
            int spawnCount = Random.Range(keyItem.minCount, keyItem.maxCount + 1);
            Debug.Log($"Spawning {spawnCount} of {keyItem.keyItemPrefab.name}");

            for (int i = 0; i < spawnCount && adjacentTileList.Count > 0; i++)
            {
                Vector3Int spawnTile = adjacentTileList[0];
                adjacentTileList.RemoveAt(0);

                Vector3 spawnPosition = new Vector3(spawnTile.x, placementHeight, spawnTile.z);
                GameObject spawnedItem = Instantiate(keyItem.keyItemPrefab, spawnPosition, Quaternion.identity, transform);

                keyItemTiles.Add(spawnTile);
                Vector3 closestPathTilePosition = FindClosestPathTile(spawnTile);
                Quaternion targetRotation = Quaternion.LookRotation((closestPathTilePosition - spawnPosition).normalized);
                spawnedItem.transform.rotation = Quaternion.Euler(0, targetRotation.eulerAngles.y, 0);

                Debug.Log($"Placed {keyItem.keyItemPrefab.name} at {spawnPosition}, facing {closestPathTilePosition}");

                RemoveAdjacentTiles(spawnTile, validAdjacentTiles, keyItemTiles);
            }
        }
    }

    // Method to shuffle a list
    private void ShuffleList(List list)
    {
        System.Random rng = new System.Random();
        int n = list.Count;
        while (n > 1)
        {
            n--;
            int k = rng.Next(n + 1);
            (list[k], list[n]) = (list[n], list[k]); // Swap elements
        }
    }

    // Method to remove adjacent tiles to a placed key item
    private void RemoveAdjacentTiles(Vector3Int keyItemTile, HashSet validAdjacentTiles, HashSet keyItemTiles)
    {
        // Get adjacent tiles (up, down, left, right)
        Vector3Int[] adjacentTiles = new Vector3Int[]
        {
    keyItemTile + Vector3Int.right,
    keyItemTile + Vector3Int.left,
    keyItemTile + Vector3Int.forward,
    keyItemTile + Vector3Int.back
        };

        // Remove adjacent tiles from the valid adjacent tiles set to avoid key items spawning too close to each other
        foreach (var adjacentTile in adjacentTiles)
        {
            validAdjacentTiles.Remove(adjacentTile);
            keyItemTiles.Add(adjacentTile);  // Mark adjacent tiles as occupied by a key item
        }
    }

    // Method to find the closest path tile to a given position
    private Vector3 FindClosestPathTile(Vector3Int keyItemPosition)
    {
        Vector3 closestPathTile = Vector3.zero;
        float closestDistance = float.MaxValue;

        foreach (var path in allPaths)
        {
            foreach (var pathTile in path)
            {
                Vector3 pathTilePosition = new Vector3(pathTile.x, 0.5f, pathTile.z);  // Get path tile position
                float distance = Vector3.Distance(keyItemPosition, pathTilePosition);

                if (distance < closestDistance)
                {
                    closestDistance = distance;
                    closestPathTile = pathTilePosition;
                }
            }
        }

        return closestPathTile;
    }


    // Call this method when obstacles are placed to track their positions
    private void RegisterObstacle(Vector3Int position)
    {
        obstacleTiles.Add(position);
    }


    private IEnumerator FallToPosition(GameObject tile, Vector3 targetPosition)
    {
        float timeElapsed = 0f;
        Vector3 startPosition = tile.transform.position;
        float duration = totalFallTime / gridWidth;  // Adjust duration as necessary

        while (timeElapsed < duration)
        {
            timeElapsed += Time.deltaTime;
            tile.transform.position = Vector3.Lerp(startPosition, targetPosition, timeElapsed / duration);
            yield return null;
        }

        tile.transform.position = targetPosition;
    }


    private List> GenerateMultiplePaths(Vector3Int start, int pathCount)
    {
        List> allPaths = new List>();
        HashSet usedTiles = new HashSet();

        for (int i = 0; i < pathCount; i++)
        {
            Vector3Int newEndTile = SelectEndTile(start); // Get a new end tile
            HashSet newPath = GeneratePath(start, newEndTile);

            if (newPath.Count > 1)
            {
                allPaths.Add(newPath);
                usedTiles.UnionWith(newPath); // Mark path tiles as used
            }
            else
            {
                Debug.LogWarning($"Path {i + 1} was too short or invalid. Skipping...");
            }
        }

        return allPaths;
    }

}
WallVisibilty
Toggles the outer wall visibility of all walls facing the player to reveal the game board.
Toggles the active state of the walls closest to the designated point; walls within the radius are toggled off, and those outside remain visible.
using System.Collections;
using System.Collections.Generic;
using UnityEngine;

public class WallVisibilityToggler : MonoBehaviour
{
    public GameObject cameraObject;  // Reference to the camera object instead of the camera component
    public float toggleDistance = 10f;  // Distance threshold for toggling wall visibility
    private List walls = new List();  // List to store all walls
    private float wallCheckInterval = 5.5f;  // Interval for updating the wall list
    private float nextWallCheckTime = 0f;  // Timer to track when to update walls
    private bool wallsPlaced = false;  // Track if walls are placed

    void Start()
    {
        StartCoroutine(WaitForWalls());
    }

    IEnumerator WaitForWalls()
    {
        TileManager tileManager = FindObjectOfType();  //  Get TileManager

        if (tileManager == null)
        {
            Debug.LogError("TileManager not found!");
            yield break;
        }

        yield return new WaitUntil(() => tileManager.AreWallsPlaced);  //  Wait for walls
        UpdateWallList();
        wallsPlaced = true;
        Debug.Log("WallVisibilityToggler started: Walls have been placed.");
    }

    void Update()
    {
        if (!wallsPlaced || cameraObject == null) return;  //  Ensure cameraObject is assigned and walls are placed

        // Periodically update the wall list (e.g., every 5.5 seconds)
        if (Time.time >= nextWallCheckTime)
        {
            UpdateWallList();
            nextWallCheckTime = Time.time + wallCheckInterval;
        }

        // Toggle wall visibility every frame
        ToggleWallsBasedOnDistance();
    }

    void UpdateWallList()
    {
        walls.Clear();
        foreach (Transform child in transform)
        {
            if (child.CompareTag("Wall"))
            {
                walls.Add(child.gameObject);
            }
        }
        Debug.Log($"Total Walls Detected: {walls.Count}");
    }

    void ToggleWallsBasedOnDistance()
    {
        int hiddenWallCount = 0;
        Vector3 cameraPosition = cameraObject.transform.position;  // Use camera object position

        foreach (GameObject wall in walls)
        {
            float distance = Vector3.Distance(cameraPosition, wall.transform.position);
            bool shouldBeVisible = distance >= toggleDistance;

            wall.SetActive(shouldBeVisible);

            if (!shouldBeVisible)
                hiddenWallCount++;
        }
        Debug.Log($"Hidden Walls: {hiddenWallCount}/{walls.Count}");
    }
}
TempWin
A temporary script was developed for the Code&Canvas Showcase, allowing for a more seamless transition between gameplay tests.
It uses OnTriggerEnter and box colliders attached to the key item prefabs to reset the game when the player reaches the correct destination: the collector object.
Level reset upon win Example 1
Level reset upon win Example 2
                using System.Collections;
using UnityEngine;
using UnityEngine.SceneManagement;

public class TempWin : MonoBehaviour
{
    [Header("Scene Reset Settings")]
    public float resetDelay = 0.1f; // Exposed for easy tuning in Inspector

    private bool hasTriggered = false; // Prevent multiple triggers

    private void OnTriggerEnter(Collider other)
    {
        // Prevent multiple triggers
        if (hasTriggered) return;

        if (other.CompareTag("Player")) // Use "Player" with uppercase P (Unity default)
        {
            hasTriggered = true;
            Debug.Log("Player entered trigger. Resetting scene in " + resetDelay + " seconds...");
            StartCoroutine(ResetSceneAfterDelay(resetDelay));
        }
        else
        {
            Debug.Log($"Ignored trigger from: {other.name}");
        }
    }

    private IEnumerator ResetSceneAfterDelay(float delay)
    {
        yield return new WaitForSeconds(delay);
        SceneManager.LoadScene(SceneManager.GetActiveScene().name);
    }

    void Update()
    {
        if (Input.GetKeyDown(KeyCode.Y))
        {
            StartCoroutine(ResetSceneAfterDelay(resetDelay));
        }
    }

}
Team Google Drive
The most impactful lesson learned was how to conduct appropriate client communication. Consistent and frequent communication with the client enabled the quick resolution of issues, as well as the implementation of proper modifications and execution methods. Early client communication was excellent from the team; however, as time went on and the team began to grow busier, client communication began to break down, and issues tended to clog the production pipeline.
The minor lessons typically focused on smaller production and refinement tasks, such as implementing specific game mechanics, utilising certain code concepts, and integrating other team members’ assets. These lessons have become instrumental in furthering my understanding of the game production pipeline and proper industry practices. These skills will likely prove instrumental for securing potential employment. In the future, overhauls of some of these systems would be desirable to apply the techniques and structuring learned, as early scripts remain disorganised. Scripts such as the tile manager would preferably be reduced in length and split into several scripts.
This project aims to align itself with United Nations Sustainable Development Goal 8 (SDG8) by contributing to economic growth in the creative industry. Through the use of game development, it creates potential employment opportunities, supports industry innovation, and further advances areas such as accessibility.
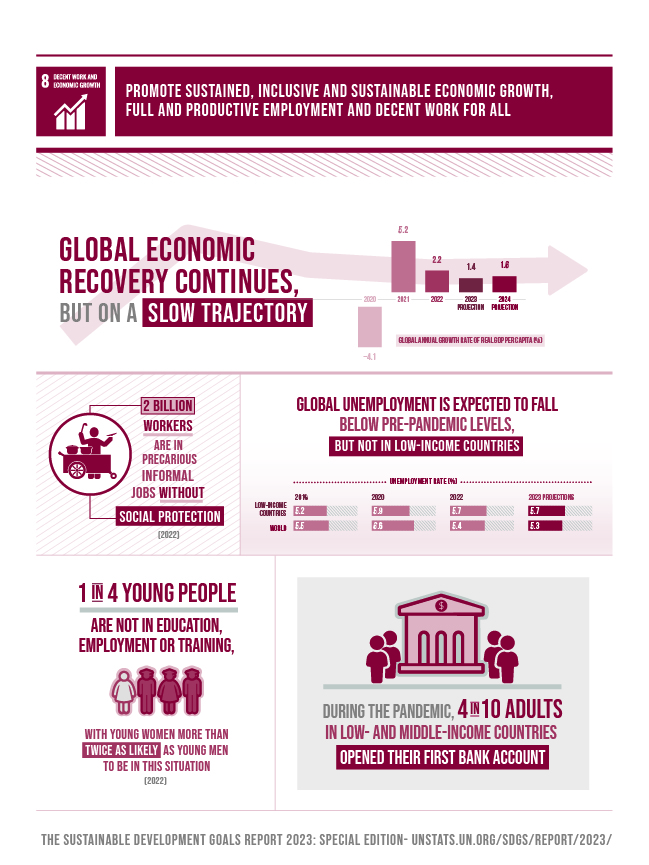
UN SDG8 Graphic
It has encouraged and required the use of learning and applying relevant industry skills, such as C# programming, Unity Game development, level design, and user-centred prototyping. It allowed for the creation of a collaborative environment and opened up opportunities for the development of team-based skills relevant to the digital creative industry. While also incorporating accessibility orient design practices and promoting the idea of inclusive thinking and relating to the target audience.
The project aimed to create a more welcoming and sustainable demographic within the gaming sector for older age groups. The gaming industry is a market primarily dominated by a younger audience, typically those aged 25 and below. Noticing this trend, Q.U.OT.A decided to take advantage of the undeveloped market that the client wished to address by focusing on digital inclusivity and age-oriented accessibility practices that could be applied to the broader industry, thereby accessing a whole new untapped market.
Research shows that understanding broader economic and labour structures is of great significance and aids in game development and distribution. (Cairns et al., 2019). These include accounting for the target audience’s profile, such as their age or socioeconomic class, which can provide insight into the wants and needs of the target audience and are instrumental in further understanding SDG8’s application to the gaming industry.
The Q.U.O.T.A project semi-successfully delivered a functional prototype that showcased the client’s core gameplay mechanics in an accessible and visually coherent format. Guided by RaRa Games’ brief, the development team focused on key systems, such as grid-based movement and procedural level generation, while balancing scope limitations and available skill sets. Client expectations for controller and keyboard support were addressed; however, only partial input support was ultimately implemented due to technical constraints. Significant design adjustments were made based on research and feedback, particularly to enhance UI clarity and align the difficulty level with audience preferences. The team demonstrated strong collaboration, adaptive planning, and a commitment to accessibility, aligning with SDG 8 by developing practical, industry-relevant skills. Despite time and scope challenges, the team produced a cohesive demo that offers a promising foundation for further development and refinement. The project not only met its educational goals but also created value for both the client and the development team.