Rob Blofield is a client with a vision for a fun and dynamic multiplayer gaming experience. The brief focused on creating a 2D platform fighting game that merges familiar mechanics with unique, standout features. The gameplay emphasizes floaty yet fast-paced movement, giving players high vertical mobility through mechanics like double-jump rocket boots. The game introduces a tiebreaker race, a distinctive element that sets it apart from others in the genre by adding a thrilling final stage to determine the winner.
Deliver a polished gameplay demo that meets expectations for innovative mechanics, ensuring it is both engaging and functional. The game concept includes casual gameplay elements like wacky items to alter combat flow and maintain excitement. The project also required documentation and preparation for future scalability, including plans for character campaigns, upgrades, and additional modes, ensuring a long-term value proposition for the client.
The project draws inspiration from popular games like Super Smash Bros (2D stage-based competitive fighter), Gang Beasts (fun fighting party game with wacky physics), and Risk of Rain (simple color palette). What sets this game apart is its blend of casual, fast-paced action, wacky movement options, and a space prison theme. Unique features include an enclosed 2D stage, an ending race tie-breaker, and an Airlock Breach event that flings players outside.
Fighting game enthusiasts and party gamers of all ages
“High Octane, High Stakes, and Fast Paced Action.”
“No time for messages here. Put up your dukes and fight to the death!”
Unity, Blender, Visual Studio Code, Adobe Mixamo, Adobe Substance Painter, Adobe Illustrator. Unity was chosen for its familiarity and support for C#. Blender offered accessible 3D modeling. VS Code was used for scripting. Adobe tools aided in animations, textures, and UI design, aligning with client specifications for format and quality.


Unity was the core game engine, enabling scripting within a physics simulation environment. Blender facilitated 3D modeling. VS Code provided a seamless coding interface for Unity and C#. Familiarity with these tools ensured efficiency, meeting client requirements for C# scripting, .FBX models, and 2D .PNG game elements.
Early Findings: The Unity Input System was ideal for enabling cross-platform functionality (PC, Xbox, PlayStation) and multiplayer support (Unity3d.com, 2024). A clear visual style was essential for shaping the game's identity and managing player expectations (Blackman, 2013). These insights heavily influenced the project's direction.
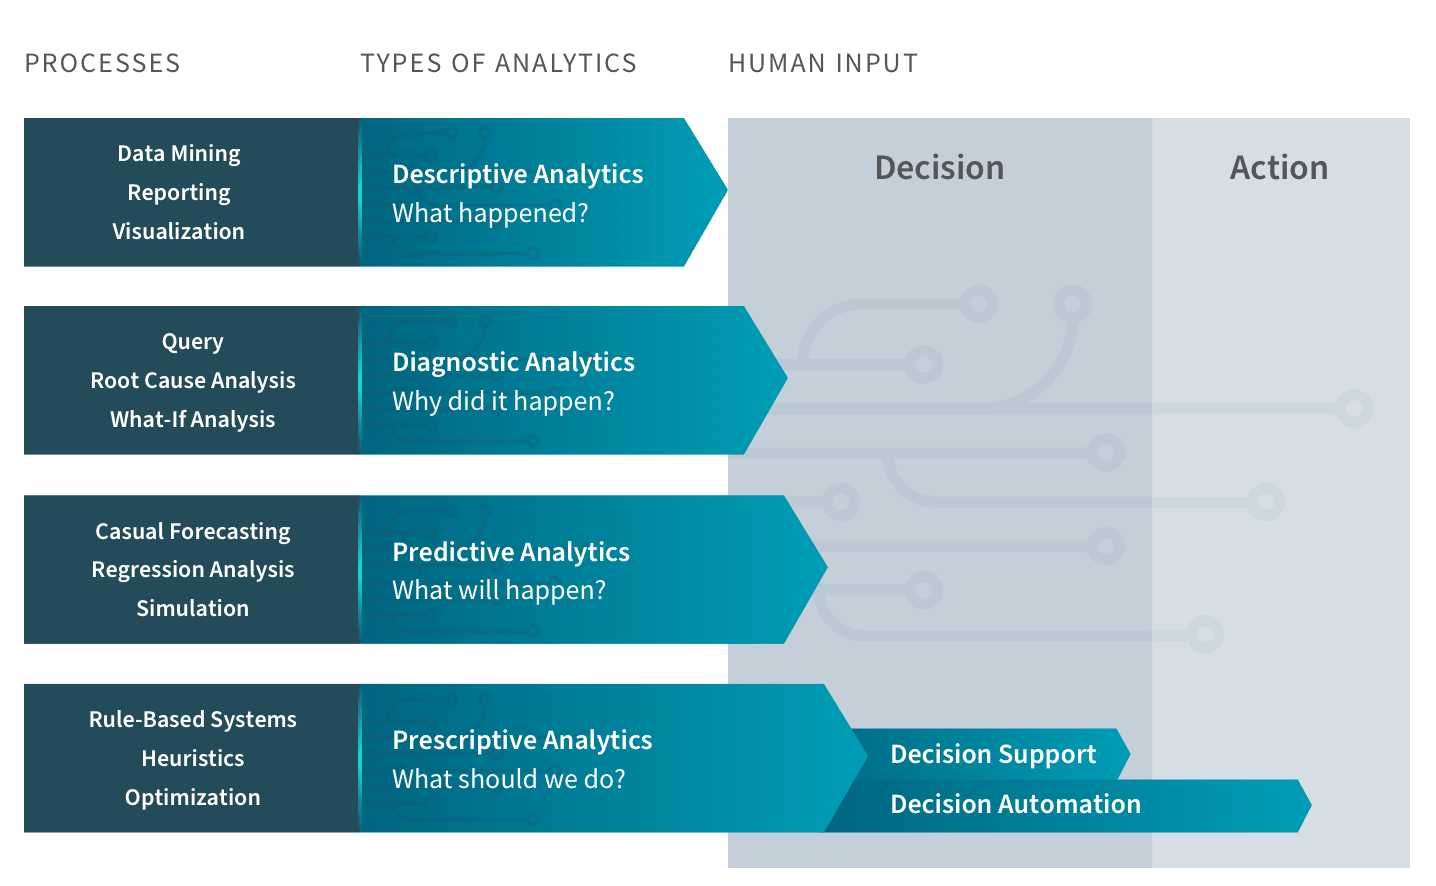
The team employed predictive analysis (forecasting future outcomes) and prescriptive analysis (determining the best course of action) (Stevens, 2023). The goal was to understand the audience's likely response to the game and prioritize development based on client expectations and industry best practices
Unity’s Documentation Manual and Beginning 3D Game Development with Unity 4 by Sue Blackman were invaluable. The Manual helped us tackle specific problems, while Blackman’s book offered insights into game development trends and practical Unity applications.
Data Analysis chart By: Qlik
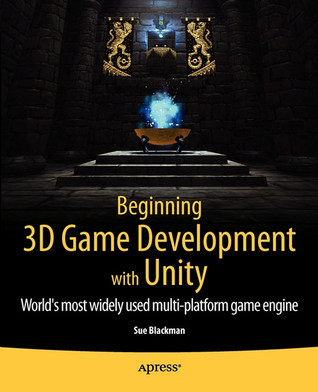
Beginning 3D Game Development with Unity 4 : All-In-one, Multi-platform Game Development By: Sue Blackman
Throughout development, core elements like the player movement script and stage design underwent significant changes. Initially, the movement script relied on Unity’s input manager, but research revealed that the newer Unity Input System provided greater flexibility. This allowed seamless integration of two-player functionality. Stage design research highlighted player frustration with excessive restrictions (Slack, 2022). Instead of limiting attacks, angled corners were added to prevent opponents from repeatedly bouncing into players, enhancing gameplay flow.
Initially, the team focused on competitive gameplay, but the client emphasized a party-game focus for casual audiences. Research supported this shift, showing party games thrive on player-generated fun rather than complex mechanics (Mandeville, 2021).
Findings underscored the need to balance freedom, skill expression, and fun, especially for multiplayer scenarios. Plans evolved to address this, such as allowing in-air directional changes post-jump. Testing confirmed these changes improved player satisfaction and aligned with project goals.
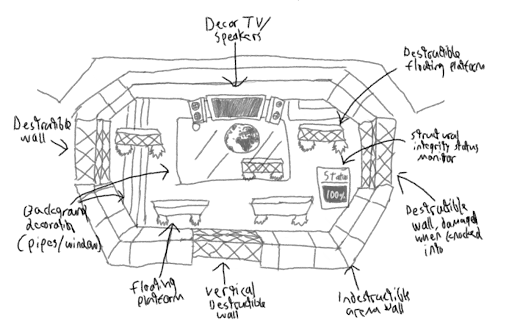
Arena Sketch by Vincent Chen
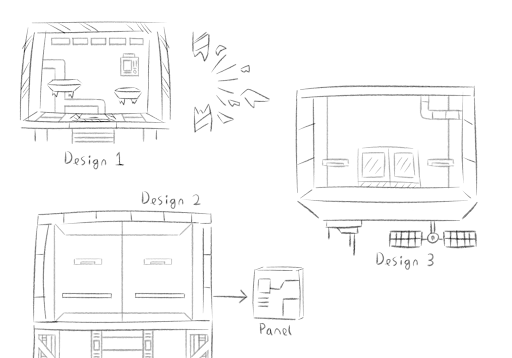
Other Stage Concepts by various Group Members
At the start, team roles were defined, and tasks were assigned accordingly. Team members chose their preferred tasks, which were later redistributed based on progress. The development began with the prototype movement system, where Dan P and I implemented basic movement using the Unity Input System for controller support. Vincent created initial models based on Alexander’s concept sketches. Dan K researched and developed additional systems, while Josh explored UI practices for future integration. After the early stages, the team worked independently on their designated tasks.
Methods Used: Face-to-face meetings, email, Discord Frequency: Communication was minimal during early development. However, in later stages, the team held weekly meetings to discuss progress and required changes.
Initially, there was a misalignment between the team’s understanding of the game’s art direction. This led to early sketches and prototype models not fitting the established theme. The issue was resolved later, but it resulted in delays and impacted further development.


The client requested increased vertical stage space to enhance movement freedom. This included adding platforms for better navigation and control. Developers implemented adjustable jump mechanics to allow players nuanced in-air mobility. Designers modified player size and stage height to optimize spatial use, which satisfied client goals. Additionally, moving and disappearing platforms were introduced to dynamically alter combat flow, ensuring varied gameplay experiences.
The lack of initial vertical movement options posed a challenge. Other issues included inconsistencies in 3D model designs, concept sketches misaligned with final products, and gameplay bugs. While most were resolved by delivery, addressing these issues limited future feature development.
The game is similar to Super Smash Bros for its percentage-based health launch system, Gang Beasts for its blob-like character design and focus on party gaming, and Risk of Rain for its art direction inspiration.
Borrowed the Smash Bros volatility system, where player launch distance increases with a percentage-based health system, allowing comeback potential within gameplay boundaries.
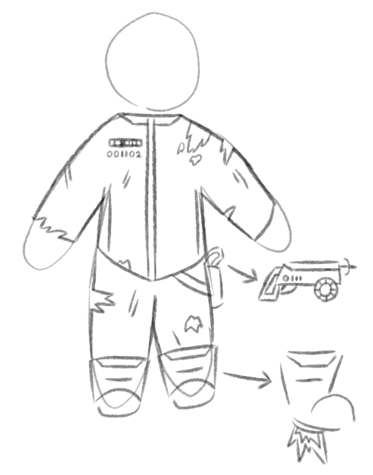
Movement was designed to feel floaty, matching the space setting, with tools like double-jump for enhanced vertical mobility. Power-ups were ideated but marked as low priority. The race mechanic, required by the client, determines the winner among survivors by a Y-axis scaling race.
Early Sketch by various team members
Early Sketch by various team members
During development, several ideas from the prototyping phase were refined or adjusted to align with the client’s requirements. Non-essential features, such as an in-depth item/loot box system and full-player animation cycles, were excluded from the early build to focus on mechanical testing. Basic animations were implemented to provide essential player feedback without diverting resources from core gameplay. Research supported prioritizing a solid gameplay loop over extensive visual elements for testing purposes (Bryce, 2020). Key gameplay elements, including movement, wall damage, and gravity, underwent iterative modifications based on client feedback. For example, player speed was increased for better maneuverability, and wall damage calculations were adjusted to factor in player velocity. Serialized fields allowed for on-the-fly adjustments during feedback sessions, ensuring flexibility.Challenges arose with attack animations and the grappling gun mechanic. Despite significant effort, unresolved issues led to simplified implementations that met client needs while adhering to project constraints.
This script allows a player to grab onto walls a short distance in front of them based on where they’re looking. This is the most functional variation of the script given to the client. Modified to function more like a grappling gun rather than a grab based on client feedback.
using System.Collections;
using System.Collections.Generic;
using UnityEngine;
using UnityEngine.InputSystem;

public class LedgeGrab : MonoBehaviour
{
    public LayerMask grabLayer; // Define what can be grabbed
    public float grabRange = 1.5f; // Distance in front of the player to check for ledges
    private bool isGrabbing = false; // Whether the player is currently grabbing
    private Rigidbody rb; // Rigidbody for controlling movement physics
    private Vector3 originalVelocity; // Store velocity before grabbing
    private PlayerInput playerInput; // For handling player input
    private InputAction grabAction; // Input action for grabbing

    void Start()
    {
        rb = GetComponent(); // Initialize Rigidbody
        playerInput = GetComponent(); // Initialize PlayerInput
        grabAction = playerInput.actions["Grab"]; // Assign the grab action
    }

    void Update()
    {
        DebugRay(); // Visualize the grab ray for debugging

        // Check if the grab button is pressed and a grab is possible
        if (grabAction.IsPressed() && CanGrabSurface(out RaycastHit hit))
        {
            if (!isGrabbing)
            {
                StartGrab(hit); // Start the grab if not already grabbing
            }
        }
        else if (isGrabbing && !grabAction.IsPressed())
        {
            ReleaseGrab(); // Release the grab when the button is no longer pressed
        }
    }

    private bool CanGrabSurface(out RaycastHit hit)
    {
        // Define the ray's origin and direction
        Vector3 rayOrigin = transform.position + Vector3.up * 0.5f; // Slightly above the player's position
        Vector3 rayDirection = transform.forward; // Directly in front of the player

        // Check if the ray hits a valid surface
        if (Physics.Raycast(rayOrigin, rayDirection, out hit, grabRange, grabLayer))
        {
            // Ensure the surface's angle is suitable for grabbing
            if (Vector3.Angle(hit.normal, Vector3.up) > 45f && Vector3.Angle(hit.normal, Vector3.up) < 135f)
            {
                return true;
            }
        }

        hit = default;
        return false;
    }

    private void DebugRay()
    {
        // Visualize the ray in the Scene view
        Vector3 rayOrigin = transform.position + Vector3.up * 0.5f; // Offset to avoid ground collision
        Vector3 rayDirection = transform.forward; // Align with player's facing direction

        Color rayColor = Physics.Raycast(rayOrigin, rayDirection, out _, grabRange, grabLayer) ? Color.green : Color.red;
        Debug.DrawRay(rayOrigin, rayDirection * grabRange, rayColor);
    }

    private void StartGrab(RaycastHit hit)
    {
        isGrabbing = true;

        // Stop the player's movement
        originalVelocity = rb.velocity;
        rb.velocity = Vector3.zero;
        rb.isKinematic = true;

        // Move player to the grab position slightly above and in front of the hit point
        Vector3 grabPosition = hit.point + hit.normal * 0.5f + Vector3.up * 0.5f;
        transform.position = grabPosition;

        // Align the player to face the surface
        transform.forward = -hit.normal;
    }

    private void ReleaseGrab()
    {
        isGrabbing = false;

        // Restore player physics
        rb.isKinematic = false;
        rb.velocity = originalVelocity; // Restore velocity before grabbing
    }
}
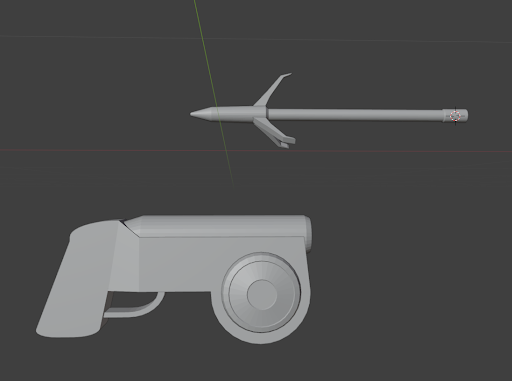
Grapple Gun Model by Vincent Chen
SCript in Action
This script controls the player’s movement and jumping, including double jumping and smooth rotation while moving:
using System.Collections;
using System.Collections.Generic;
using UnityEngine;
using UnityEngine.InputSystem;

public class PlayerMovement : MonoBehaviour
{
    PlayerInput playerInput;
    InputAction moveAction;
    InputAction jumpAction;

    [SerializeField] float speed = 5f;
    [SerializeField] float jumpForce = 5f;
    [SerializeField] float rotationSpeed = 10f;
    [SerializeField] int maxJumps = 2;

    //private bool IsGrounded;
    private Rigidbody rb;
    private Vector3 lastMovementDirection;
    private int jumpCount = 0;

    // Expose IsGrounded as a property
    //public bool IsGrounded => isGrounded;

    // Expose LastMovementDirection as a property
    public Vector3 LastMovementDirection => lastMovementDirection;

    void Start()
    {
        playerInput = GetComponent();
        moveAction = playerInput.actions.FindAction("Move");
        jumpAction = playerInput.actions.FindAction("Jump");

        rb = GetComponent();
    }

    void Update()
    {
        MovePlayer();
        HandleJump();
    }

    void MovePlayer()
    {
        Vector2 direction = moveAction.ReadValue();

        lastMovementDirection = new Vector3(direction.x, 0, direction.y).normalized;
        Vector3 move = lastMovementDirection * speed * Time.deltaTime;
        rb.MovePosition(transform.position + move);

        if (IsGrounded())
        {
            // Reset jump count when grounded
            jumpCount = 0;

            if (lastMovementDirection != Vector3.zero)
            {
                    Quaternion targetRotation = Quaternion.LookRotation(lastMovementDirection);
                    transform.rotation = Quaternion.Slerp(transform.rotation, targetRotation, rotationSpeed * Time.deltaTime);
            }
         }
        else
        {
            Vector3 airMove = lastMovementDirection * speed * Time.deltaTime;
            rb.MovePosition(transform.position + airMove);
        }
    }

    void HandleJump()
    {
        if (jumpAction.triggered)
        {
            // Check if player can jump
            if (IsGrounded() || jumpCount < maxJumps) // Allow jumps based on maxJumps
            {
                rb.AddForce(Vector3.up * jumpForce, ForceMode.Impulse);
                jumpCount++;
            }
        }
    }

    /*private void OnCollisionEnter(Collision collision)
    {
        if (collision.gameObject.CompareTag("Ground"))
        {
            isGrounded = true; // Set grounded state
        }
    }

    private void OnCollisionExit(Collision collision)
    {
        if (collision.gameObject.CompareTag("Ground"))
        {
            isGrounded = false;
        }
    }*/

    public bool IsGrounded()
    {
        return Physics.Raycast(transform.position, Vector3.down, 0.8f);
    }
}

This script controls the player’s animations based on movement and actions:
using System.Collections;
using System.Collections.Generic;
using UnityEngine;
using UnityEngine.InputSystem;

public class PlayerAnimation : MonoBehaviour
{
    private Animator animator; // Reference to the Animator component for controlling animations
    private PlayerMovement playerMovement; // Reference to the player movement script
    private PlayerInput playerInput; // Reference to the PlayerInput system
    private InputAction punch; // Input action for the punch attack

    void Start()
    {
        animator = GetComponent(); // Link the Animator component
        playerMovement = GetComponent(); // Link the player movement script
        // punch = playerInput.actions["Attack"]; // Placeholder for punch input action, currently unused
    }

    void Update()
    {
        // Update animation parameters based on player movement
        if (playerMovement.IsGrounded()) // Check if the player is on the ground
        {
            // Determine if the player is moving
            bool isMoving = playerMovement.LastMovementDirection.magnitude > 0;
            animator.SetBool("isRunning", isMoving); // Set the "isRunning" animation parameter
        }

        /* Handle punch animation (currently commented out)
        if (punch.triggered)
        {
            animator.SetTrigger("PunchTrigger"); // Trigger the punch animation
        }
        */
    }
}

Early Animation Test
Later Animation Test
This script manages the behavior of walls that can break and restore, affecting gravity and player movement:
public class WallBreakEvent : MonoBehaviour
{
    private WallDamage wallDamage; // Reference to the WallDamage script
    private Renderer wallRenderer; // Renderer for visual representation of the wall
    private Collider wallCollider; // Collider for physical interaction with the wall
    public GameObject gravityPoint; // A point that applies gravity when the wall breaks

    // Initialize references when the script starts
    void Start()
    {
        wallDamage = GetComponent(); // Link to WallDamage script
        wallRenderer = GetComponent(); // Link to the wall's Renderer component
        wallCollider = GetComponent(); // Link to the wall's Collider component
    }

    // Trigger the wall break event
    public void TriggerWallBreak()
    {
        // Disable the wall's visual and physical presence
        wallRenderer.enabled = false;
        wallCollider.enabled = false;

        // Disable gravity for players and activate the gravity point
        DisableGravityForPlayers();
        ActivateGravityPoint(true);

        // Start coroutine to restore the wall after a delay
        StartCoroutine(RestoreWallAfterDelay());
    }

    // Coroutine to restore the wall after 5 seconds
    private IEnumerator RestoreWallAfterDelay()
    {
        yield return new WaitForSeconds(5f); // Wait for 5 seconds

        // Restore the wall's health, visuals, and collider
        wallDamage.currentHealth = wallDamage.maxHealth;
        wallRenderer.enabled = true;
        wallCollider.enabled = true;

        // Restore normal gravity for players and deactivate the gravity point
        RestoreGravityForPlayers();
        ActivateGravityPoint(false);

        Debug.Log("Wall has been restored to full health.");
    }

    // Enable gravity for all players
    private void RestoreGravityForPlayers()
    {
        GameObject[] players = GameObject.FindGameObjectsWithTag("Player"); // Find all players
        foreach (GameObject player in players)
        {
            Rigidbody playerRigidbody = player.GetComponent();
            if (playerRigidbody != null)
            {
                playerRigidbody.useGravity = true; // Turn gravity back on
            }
        }
    }

    // Disable gravity for all players
    private void DisableGravityForPlayers()
    {
        GameObject[] players = GameObject.FindGameObjectsWithTag("Player"); // Find all players
        foreach (GameObject player in players)
        {
            Rigidbody playerRigidbody = player.GetComponent();
            if (playerRigidbody != null)
            {
                playerRigidbody.useGravity = false; // Turn gravity off
            }
        }
    }

    // Activate or deactivate the gravity point
    private void ActivateGravityPoint(bool isActive)
    {
        if (gravityPoint != null)
        {
            gravityPoint.SetActive(isActive); // Set the gravity point's active state
        }
    }
}
Player slams into Wall to demonstrate event
This script pulls all objects with Rigidbody components towards the object it is attached to:
using System.Collections;
using System.Collections.Generic;
using UnityEngine;

public class PullObjects : MonoBehaviour
{
    // The force applied to pull objects towards this object
    public float pullForce = 10f;

    // Called once per frame
    void Update()
    {
        // Continuously pull objects towards this GameObject
        PullAllObjects();
    }

    private void PullAllObjects()
    {
        // Find all objects in the scene with a Rigidbody component
        Rigidbody[] allRigidbodies = FindObjectsOfType();

        // Iterate over each Rigidbody
        foreach (Rigidbody rb in allRigidbodies)
        {
            // Skip pulling the object this script is attached to
            if (rb.gameObject != this.gameObject)
            {
                // Calculate the direction from the Rigidbody to this object
                Vector3 directionToTarget = (transform.position - rb.position).normalized;

                // Apply a pulling force to the Rigidbody, directing it toward this GameObject
                rb.AddForce(directionToTarget * pullForce, ForceMode.Force);
            }
        }
    }
}
Player being pulled of screen by gravity point after wall break
This script manages the health of a wall and applies damage based on collision impacts:
using System.Collections;
using System.Collections.Generic;
using UnityEngine;

public class WallDamage : MonoBehaviour
{
    // Maximum health of the wall
    public float maxHealth = 100f;

    // Current health of the wall, updated when the wall takes damage
    public float currentHealth;

    // Minimum velocity required to cause damage to the wall
    public float minDamageVelocity = 1f;

    // Multiplier to calculate damage based on the impact velocity
    public float damageMultiplier = 10f;

    // Reference to a script or system that handles breaking the wall
    private WallBreakEvent wallBreakEvent;

    // Called once when the script is initialized
    void Start()
    {
        // Set the wall's current health to its maximum value
        currentHealth = maxHealth;

        // Get the WallBreakEvent component attached to the same object
        wallBreakEvent = GetComponent();
    }

    // Triggered when another object collides with this object
    private void OnCollisionEnter(Collision collision)
    {
        // Check if the colliding object has a Rigidbody component
        Rigidbody rb = collision.collider.GetComponent();

        if (rb != null)
        {
            // Calculate the speed of the collision (impact velocity)
            float impactVelocity = collision.relativeVelocity.magnitude;

            // Check if the impact velocity is above the damage threshold
            if (impactVelocity >= minDamageVelocity)
            {
                // Calculate the damage using the impact velocity and multiplier
                float damage = impactVelocity * damageMultiplier;

                // Apply the calculated damage to the wall
                TakeDamage(damage);
            }
        }
    }

    // Reduces the wall's health by the damage value
    private void TakeDamage(float damage)
    {
        // Subtract the damage from the wall's current health
        currentHealth -= damage;

        // Check if the wall's health has dropped to zero or below
        if (currentHealth <= 0)
        {
            // Trigger the wall break process
            BreakWall();
        }
    }

    // Handles the logic for breaking the wall
    private void BreakWall()
    {
        // Trigger the wall break event, which could handle effects, animations, etc.
        wallBreakEvent.TriggerWallBreak();
    }
}
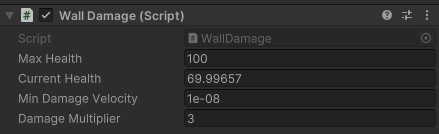
Wall damage script inspector tab demonstrating funtionality
Wall being Broken
The DM2130: Client Project "Airlock" focuses on creating a dynamic and interesting 2D platform fighting game for multiplayer use. Rob Blofield commissioned the project, to create a fast-paced game with novel elements such as floaty movement, double-jump rocket boots, and a race-based tiebreaker. The game is inspired by popular titles such as Super Smash Bros. and Gang Beasts, and it combines casual gameplay with unique objects and features. The main goal was to develop a polished gameplay demo with high vertical mobility, new features, and an exciting final race stage. The project also features a scalable roadmap for character campaigns and new modes. The development team, led by me, used Unity as the game engine, as well as Blender for 3D modeling and Visual Studio Code for scripting. The project emphasizes a mix of thrilling, casual gameplay and technical implementation, ensuring that players have fun while also being functional.